
The biggest kit isn’t automatically the best fit for your garden. The best drip irrigation kit for raised beds is the one that matches your bed dimensions, planting layout, water source, and watering routine. Comparing tubing lengths, emitter counts, and kit contents can quickly turn a simple purchase into a guessing game. Will the lines reach every row? Does the system need a timer? How much setup will it take?
You don’t need the most complicated system to water your beds thoughtfully. You need the right parts in the right places. This guide explains how to compare the features that matter, distinguish core watering parts from optional conveniences, and choose a setup with confidence.
You’ll learn how bed size and plant spacing affect tubing and emitter placement, what to consider about hose connections and timers, and how to reduce the risk of leaks or clogs with careful installation and upkeep. You’ll also find curated kit recommendations to help narrow your options. By the end, you’ll have a practical way to find a system suited to your garden, without paying for features you won’t use or coming up short on coverage.
Key Takeaways
- Measure each bed and map planting rows before estimating how much tubing your layout needs.
- Compare kit components by function to distinguish core watering parts from convenience add-ons.
- Plan the line layout before cutting, then flush and test the system according to the kit’s instructions.
- Use the best drip irrigation kit for raised beds checklist to narrow options around your garden’s practical needs.
- Compare recommendations by use case to find a promising fit without choosing more system than your beds require.
Why choose a drip irrigation kit for raised beds?
A drip irrigation kit connects a water source to your growing area and releases water near plant roots. Rather than wetting the whole bed with a hose or watering can, the system directs water to selected spots along planting rows. That can make watering more orderly, particularly when crops grow in rows or you have several beds to tend.
Targeted watering doesn’t mean every drop reaches a root, or that you can stop checking the soil. Water moves through the bed, and its pattern depends on soil, emitter placement, and flow. Keeping water near the soil surface can also mean less foliage gets wet than with overhead watering, although it doesn’t guarantee fewer plant diseases. Drip irrigation systems vary, so compare a kit’s actual components and design rather than relying on the label alone.
Depending on the design, a kit may include a water-source connection, main tubing, smaller distribution lines, emitters or drip tubing, connectors, stakes, a filter, a pressure regulator, or a timer. Some kits include only a selection of these parts; others are designed for a particular layout. Check the product details and your water-source requirements before counting on a filter or regulator being included or suitable for your setup.
How drip irrigation works in a raised bed
Water travels from the source through the main tubing, then branches into lines that run through or alongside the bed. Emitters release water gradually near plants instead of spraying their leaves. Their spacing and flow need to suit the planting pattern: a row of closely spaced seedlings may call for a different arrangement than widely spaced tomatoes. If a line misses the root zone, plants can remain thirsty even while the tubing is running.
When a kit can make garden watering easier
A planned system can help when your schedule is full or you’re watering multiple planted beds. Once the lines match the planting rows, you may make fewer hand-watering trips and avoid uneven coverage from pouring water quickly across a bed. The benefit comes from a layout that reaches the plants, not simply from using more tubing or emitters.
You’ll still need to check the bed. After watering, feel the soil in different areas and look for dry spots or pooling. Adjust line placement or run time as needed, and reassess as plants grow and their roots and spacing change. For gardeners comparing the best drip irrigation kit for raised beds, dependable performance comes from four things working together: a suitable layout, a compatible water supply, careful setup, and occasional upkeep. A kit can simplify the routine, but it can’t replace observation.
How to size a drip irrigation kit for your raised-bed layout
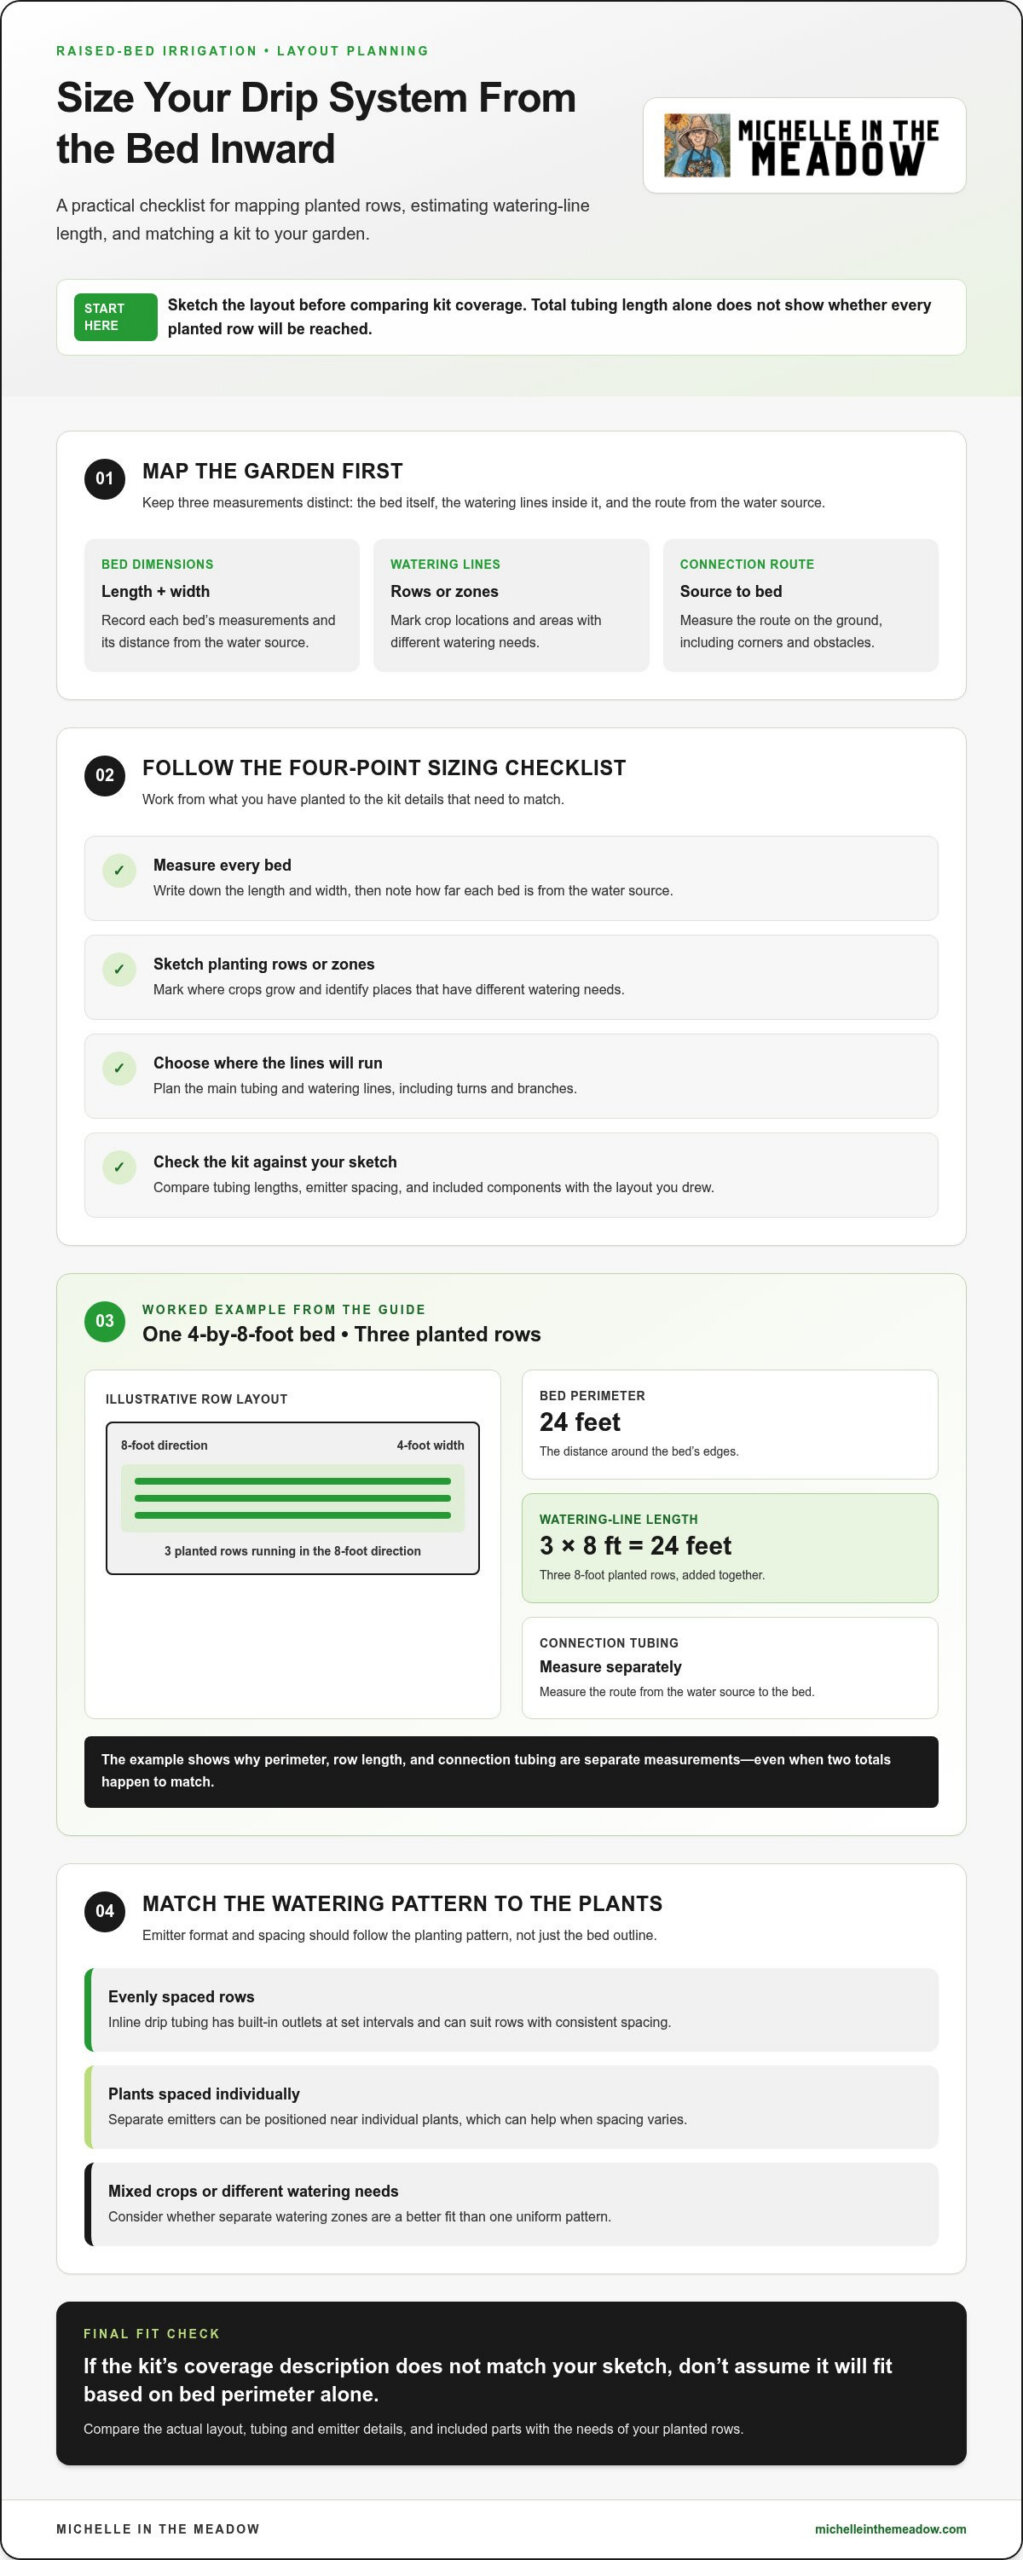
Start with a sketch, not a shopping cart. Kits describe coverage in different ways, and total tubing length alone won’t tell you whether water will reach every planted row. Work out three separate measurements: bed dimensions, the length of watering lines inside each bed, and the route connecting those lines to your water source.
- Measure each bed. Record its length and width, then note how far it is from the water source.
- Sketch planting rows or zones. Mark where crops grow and identify areas with different watering needs.
- Choose a line layout. Decide where the main tubing and watering lines will run, including turns and branches.
- Compare your sketch with kit coverage. Check tubing lengths, emitter spacing, and included components against your plan.
Measure beds and map planting rows before shopping
The distance around a bed’s edges is its perimeter, but perimeter isn’t the same as the tubing needed to water plants. Row length is the combined length of the lines serving planted rows. Connection tubing is the separate route from the water source to the bed and between system parts. Measure that route on the ground, allowing for corners and obstacles instead of adding an arbitrary extra length.
Example, not a universal specification: Imagine one 4-by-8-foot bed with three planted rows running in the 8-foot direction. The perimeter is 24 feet, while the three rows together need 24 feet of watering line. Measure connection tubing separately, from the source to the bed. The row count here illustrates the calculation; your crop spacing and layout may call for a different arrangement.
Match tubing and emitters to the plants
Inline drip tubing has built-in outlets at set intervals, which can suit evenly spaced rows. Separate emitters can be placed near individual plants, making them useful when spacing varies. Closely spaced greens may need a continuous line along a row, while widely spaced plants may be better served by emitters near each root zone. Neither format is automatically right for every bed.
Plant type, spacing, and water needs all affect how many lines you need and where the emitters should go. A bed with mixed crops may need separate watering zones instead of one uniform pattern. Compare the kit’s stated tubing length, emitter type and spacing, flow details, and coverage guidance with your sketch. If the coverage description doesn’t match the layout you drew, don’t assume it will fit based on bed perimeter alone. This check helps narrow the options for the best drip irrigation kit for raised beds.
If you’re still planning bed dimensions, the raised-bed soil calculator can help you estimate soil volume, a separate step from sizing irrigation tubing.
Which raised-bed drip kit features are worth comparing?
A kit’s parts list can look impressive, but the useful question is whether those parts suit your water source and bed plan. Compare what each component does, what the kit includes, and whether your setup needs anything additional. Some systems combine functions in one part, so use the product specifications rather than assuming every kit has the same design.
| Feature | What to compare | Why it matters |
|---|---|---|
| Tubing | Diameter, total length, and whether it’s main tubing, dripline, or both | It needs to connect properly and reach the planned rows. |
| Emitters | Built-in or separate, spacing, and stated flow information | The style affects where water is released along a row. |
| Connectors | Included fittings and compatibility with the water source and existing equipment | Matching connections help avoid a setup that can’t be assembled as planned. |
| Filter | Whether one is included or sold separately, and the kit’s guidance for use | It can help keep particles from reaching small water outlets. |
| Pressure regulator | Whether one is included, needed, or sold separately for the system | It helps manage pressure when specified for the setup. |
| Timer | Manual or timer-based operation, plus connection compatibility | A timer can add convenience, but isn’t essential for every garden. |
A higher component count doesn’t guarantee a better fit. Choose a kit whose parts cover your layout and work with your water source.
Check the parts that affect compatibility and coverage
Look beyond the headline coverage claim. Compare tubing diameter and total length, then check whether the stated coverage refers to bed area, row length, or a specific arrangement. Review emitter style, spacing, and flow details to see whether the outlets align with your planting plan. Check how the connectors attach to your water source and any equipment you already use. A filter, regulator, backflow device, or timer may be included, sold separately, or unnecessary for a particular setup. Count on a part being in the box only when it appears in the listed contents.
Weigh convenience, flexibility, and maintenance
Manual operation may suit a small garden where you prefer to water by observation. A timer can help create a regular routine, but it still needs appropriate settings and occasional attention as weather and plant needs change. If you may expand the system, check whether compatible tubing or fittings can be added and whether replacement components are available. Clear instructions also matter, especially for assembly, flushing, and routine care. A straightforward kit that suits your habits may be easier to manage than a feature-heavy one that doesn’t.
Use your bed sketch and water-source details to compare options side by side. That makes it easier to identify the best drip irrigation kit for raised beds for your setup, instead of choosing by box size or parts count. For more ideas on planning and caring for raised beds, explore more practical raised-bed gardening guides.
How to install and test a raised-bed drip irrigation kit
Dry-fitting the parts before assembly can save frustrating rework. Lay the tubing and fittings beside the beds in their planned positions, then compare the layout with the kit instructions. Make sure each line can reach its intended row and that the route stays accessible for planting, weeding, and harvesting. Cut tubing only after you’re satisfied with the route and have checked the instructions for the correct assembly method.
- Lay out the parts. Match the main tubing, branch lines, emitters, and connectors to your plan before joining anything.
- Cut and connect as directed. Follow the kit’s instructions for assembly and any required pressure-control components.
- Position and secure the lines. Place outlets near the plants’ root zones, and secure tubing so it stays in place without blocking access to the bed.
- Flush and test. Follow the kit’s directions for flushing, then run water through each bed before relying on a regular schedule.
Set up the system and check water delivery
Connect the system to the intended water source using the fittings specified for the kit. Check joints as you assemble them, but don’t overtighten or improvise connections if the instructions specify a method. During the first run, inspect the source connection, branch points, line ends, and emitters. Look for leaks, disconnected tubing, blocked outlets, or uneven water delivery. Test each bed, not just the one closest to the source.
First-run check: confirm every connection is secure, every line end is accounted for, and each planted area receives water without leaks or obvious dry spots.
Keep the system working through the growing season
Routine checks can help you catch small problems before plants show prolonged stress. Follow the kit’s maintenance guidance for inspecting the filter and flushing lines. If one section delivers less water, or a plant looks drier than its neighbors, inspect nearby emitters and connections for blockage, kinks, or movement. Don’t poke an emitter with an object unless the manufacturer’s instructions recommend that cleaning method.
- Look over tubing and connectors during regular garden checks for movement, damage, or leaks.
- Inspect and clean the filter, and flush lines as directed by the kit instructions.
- Recheck emitter placement as plants grow or the planting layout changes.
A watering schedule isn’t a substitute for checking the bed. Soil moisture and plant needs can change with weather and growth, so observe how the soil responds and adjust your routine. If freezing weather is part of your season, follow the kit’s guidance for draining and storing components before temperatures drop. Where freezing isn’t a concern, seasonal winter storage may not apply. A careful first test is a useful step toward getting the most from the best drip irrigation kit for raised beds.
For more practical guidance as you plan and care for your beds, explore raised-bed gardening resources.
Choose the best drip irrigation kit for your raised beds
There isn’t one setup that suits every garden. A compact bed, several long rows, and beds spread across a yard call for different tubing routes and coverage. Use your measurements, water-source connection, planting layout, and preferred level of upkeep to make the final choice. A timer may matter if you want scheduled watering; for a small garden you check often, a manual setup may be enough. Expandability is more useful as your garden grows than a box full of parts you won’t use.
Match the kit to your garden, not a generic ranking
These options offer different starting points for comparison, not a universal ranking. The details below reflect information available in October 2026. Product details can change, so compare the listing for the model you’re considering.
| Option | Potential use case | Verified detail |
|---|---|---|
| Rain Bird Raised Bed Garden Kit (GARDENKIT) | A dedicated raised-bed kit to compare for a straightforward bed setup | Listed at $53.49 on the Rain Bird website. A bundle with a premium hose-end timer is listed at $118.99. |
| Hoss Raised Bed Irrigation Kit | Gardeners comparing a kit described for multiple beds | Supports up to 8 raised beds measuring 4 ft. by 8 ft., according to the supplied product information. |
| DripWorks Garden Bed Irrigation Kits | A garden where comparing small, medium, and large kit categories is useful | Listed in small, medium, and large options; compare the coverage and components for the selected size. |
| DIG Raised Bed Garden Drip Kit (ML50) | A compact raised-bed option to include in a comparison | Listed at City Mill; compare its product specifications with your bed plan. |
Prices and listings can change. The Rain Bird price above is its website listing, while the DIG listing was at City Mill; the DripWorks range varies by kit size. These details don’t establish that a kit will cover a particular layout. Match its published tubing, emitter, and connection specifications to your measurements before deciding.
Make the purchase with clear expectations
Before ordering, review the exact model and package contents, total tubing length and diameter, emitter type and spacing, stated coverage, connector compatibility, and whether a filter, regulator, backflow device, or timer is included or sold separately. For an expandable system, look for information about compatible additions and replacement parts. Instructions and maintenance guidance can also affect how manageable the kit feels over a full growing season.
Affiliate disclosure: Some links in this guide may be referral links. If you buy through one, Michelle In The Meadow may earn a commission, at no additional cost to you. Recommendations are selected to help you compare options, not based on a claim of hands-on testing.
The best drip irrigation kit for raised beds is the one whose published coverage and connections fit your garden and routine. Use your bed sketch and water-source details to compare product specifications before purchasing. For more garden-planning ideas, browse Michelle In The Meadow’s gardening resources.
Let Your Watering System Grow With Your Garden
Your first setup doesn’t have to be your forever setup. As crops mature, planting plans shift, and you learn how your beds respond, small adjustments can help the system suit the garden you have now. Keep notes on what you change and what you observe. Over time, those notes can guide decisions about expanding or adapting the best drip irrigation kit for raised beds instead of starting from scratch each season.
Gardening is a process of noticing, trying, and learning. Michelle In The Meadow shares practical gardening education through blog and video content, along with a soil calculator for raised beds to support your garden planning. Explore Michelle In The Meadow’s practical gardening guides for ideas to carry into your next growing season.
Start with your bed measurements and planting layout, then use the guides and soil calculator at Michelle In The Meadow to plan your next garden steps.
Frequently Asked Questions
Can I use a drip irrigation kit with a rain barrel?
Yes, a rain barrel can supply some drip setups, but gravity-fed water may not meet a kit’s pressure needs. The barrel’s outlet height, water level, tubing route, and emitter type all affect whether water reaches the bed. A setup designed for a pressurized hose may behave differently when supplied by a barrel. Look for kit guidance on low-pressure use, then test the farthest outlet as the barrel level drops.
Do drip irrigation kits work with elevated raised beds?
Yes, an elevated raised bed can work with a drip kit if the source provides the pressure and flow the kit requires. Height changes along the route can affect delivery, so don’t assume a system will perform identically above ground. Support tubing at the bed edge, leave slack at connections, and check outlets near and far from the source during a full test run. Watch for fittings pulled loose as soil settles.
Can I use one drip irrigation kit for containers and raised beds?
Possibly. The best drip irrigation kit for raised beds and containers depends on whether one setup can serve both without mismatched watering. A bed of leafy greens and a pot of herbs, for example, may dry at different rates even with the same water source. Sketch both areas, note plants with different needs, and see whether the system can be separated into zones. Test each area before setting a shared routine.
Is drip irrigation suitable for seedlings in raised beds?
Yes, drip can water seedlings, but place outlets so moisture reaches their small root zones without leaving nearby starts dry. For a newly transplanted row, check several spots after a short test instead of judging by one damp patch. Seedlings can be easy to overlook as conditions change, so inspect them and the surrounding soil regularly. As plants develop, adjust emitter placement so water continues reaching the expanding root area.
Can a drip irrigation kit work with well water?
Yes, a kit may work with well water, but particles or mineral deposits can affect small outlets and filtration needs. Follow the kit’s guidance for water quality and filters, and observe system flow during its first run. If only a few emitters slow, inspect those points; if flow changes across the system, check the filter and supply too. Repeated clogging is a reason to investigate the cause, not just replace emitters.
Should drip tubing go under or over mulch in a raised bed?
Surface-laid tubing can often be covered with mulch if the kit instructions allow it. Keep connectors accessible so you can spot seepage, and avoid putting heavy material directly on delicate fittings. After adding mulch, run the system and check soil beneath it in several places. This helps reveal whether moisture is spreading around the plants or pooling in one spot. A movable mulch layer also makes seasonal tubing checks easier.
What should I do if a drip irrigation emitter stops flowing?
Start by checking whether the problem affects one emitter or several. If only one is dry, look for a nearby kink or loose branch connection; if multiple outlets have weakened, inspect the filter and water supply. Flush the line and clean or replace the emitter only as the manufacturer directs. Run the system again, then check the soil around the plant, since visible outlet flow doesn’t always show how far moisture spreads.
For more practical help planning raised beds and choosing garden tools, explore Michelle In The Meadow’s gardening guides and resources.
