
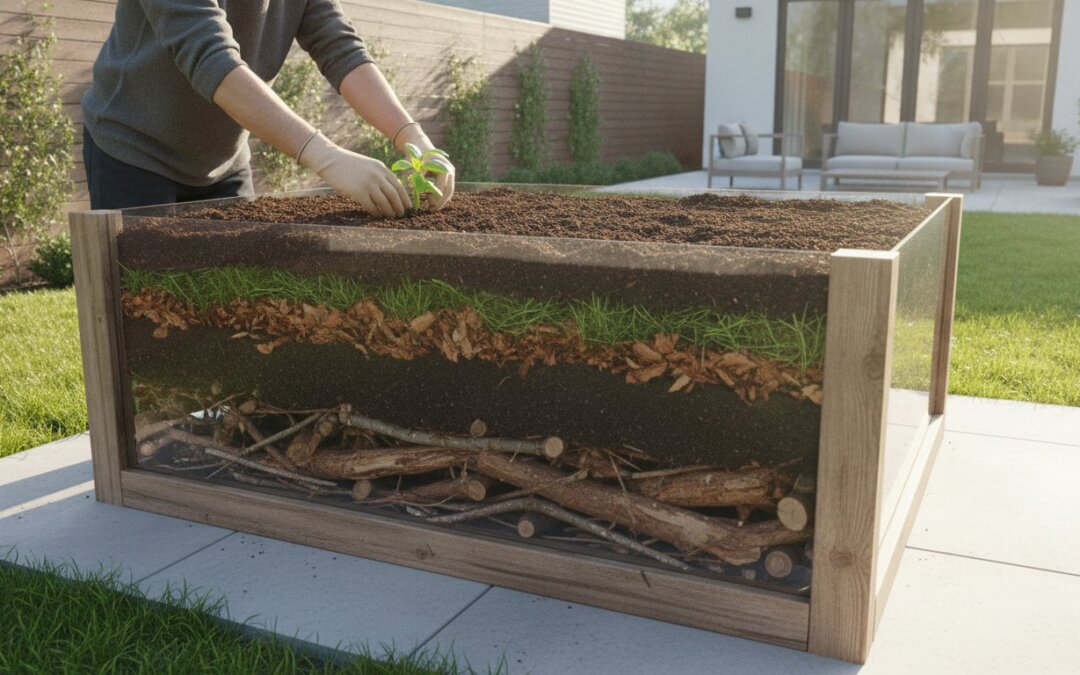
Did you know that a standard 8×4 raised bed can easily swallow $200 worth of premium bagged soil before you’ve even planted your first seedling? It’s a frustrating reality for many of us who just want to grow our own food without draining our savings. If you’re feeling overwhelmed by the high cost of bagged mixes or the physical dread of moving bulk dirt, you aren’t alone. The secret to filling raised beds on a budget isn’t about finding a cheaper bag; it’s about shifting your mindset to see your bed as a long-term composting project rather than a one-time purchase.
I promise that you can build a nutrient-rich, earth-friendly foundation for less than $50 by using materials you might already have or can find for free. In this guide, we’ll break down the science of layering organic matter like logs and leaves to create a thriving ecosystem from the bottom up. We’ll also look at how to source free local resources and use a soil calculator to plan your project with precision. By the time we’re done, you’ll have a clear, manageable plan to get your garden growing without the financial stress.
Key Takeaways
- Stop overpaying for bagged soil by learning how to use organic “fillers” that actually improve your soil health over time.
- Master the Hugelkultur and “Core” methods to turn logs, branches, and yard waste into a self-watering foundation for your plants.
- Follow our checklist for sourcing free materials like arborist wood chips and cardboard to make filling raised beds on a budget a reality.
- Use a dedicated soil calculator to determine exactly how much material you need, preventing expensive guesswork and waste.
- Get a clear, step-by-step blueprint for layering your beds correctly to ensure long-term success as your organic materials naturally settle.
The Real Cost of Filling Raised Garden Beds (And Why It Matters)
There is a specific kind of “sticker shock” that hits every new gardener at the local garden center. You’ve built or bought a beautiful 4×8 bed, and you’re ready to plant. Then, you look at the price of premium potting mix. To fill a standard 4×8 bed that is 12 inches deep, you need about 32 cubic feet of soil. At $10 to $15 per large bag, you’re suddenly looking at a bill of over $200 just to get started. This “Bagged Soil Trap” stops many people before they even put a seed in the ground. It’s a high entry price that honestly doesn’t have to exist.
Understanding volume is the first step toward filling raised beds on a budget. Soil isn’t a static material; it’s a living thing that settles and compresses over time. Most beginners calculate their needs based on the empty space, only to find the bed looks half empty after the first heavy rain. Beyond the cost, there’s an environmental price to pay for those plastic bags. Many commercial mixes rely heavily on peat moss, which is harvested from sensitive bog ecosystems. By choosing a budget-first approach, you aren’t just saving money. You’re actually building better soil health by using local, organic materials that mimic the forest floor.
Bulk Soil vs. Bagged Mix: A Price Comparison
If your project requires more than one cubic yard of material, bulk delivery is almost always the winner. Verified national averages show that bulk topsoil costs between $10 and $50 per cubic yard. In contrast, buying that same amount in bags can cost between $80 and $180. You’re essentially paying a “convenience tax” for the plastic packaging and the ease of transport. However, bulk dirt has its own quirks. You’ll likely face a delivery fee ranging from $50 to $150, and you might inherit “mystery” weed seeds from unscreened soil. For smaller projects under a yard, bags might save your back, but for anything larger, bulk is the way to go.
Why Your Bed Doesn’t Need 100% High-End Soil
You don’t need to fill the entire depth of a tall bed with expensive, nutrient-dense potting mix. The active growth zone is the top layer of soil where the majority of vegetable roots reside and absorb nutrients. For most vegetables, this zone is only 6 to 12 inches deep. The space beneath that can be filled with much cheaper materials without hurting your harvest. This is where techniques like Hugelkultur come in, using decaying wood and yard debris to fill space. By using “filler” for the bottom half of your bed, you can easily slash your soil costs by 50% or more while creating a reservoir of moisture for your plants.
The Layering Secret: Hugelkultur and the Core Method
If you’re looking for a way to stop spending hundreds on soil, the answer is likely waiting in your backyard or a nearby park. We call this layering, but nature simply calls it a forest floor. The most famous version of this technique is Hugelkultur. This is a German term for “mound culture,” where you use rotting wood as the structural base of your garden. For those of us in the suburbs with limited space, we use a modified “Core” method. Instead of a giant mound, we tuck those logs and branches into the bottom of our frames. This is the ultimate secret to filling raised beds on a budget because it replaces expensive soil with free, slow-burning fuel.
Think of your bed as a slow-release fertilizer factory. As the wood at the bottom decays, it releases nutrients over several years, feeding your plants from below. This is very similar to lasagna gardening, which uses thinner layers of organic matter to build soil from scratch. While you’re gathering these materials, it’s easy to get overwhelmed by how much you actually need. I always recommend using a Soil Calculator for Raised Beds first so you don’t end up with a half-empty bed or a pile of leftover logs on your driveway.
The Science of the Sponge
When you bury wood, you’re creating a literal sponge. Old, punky logs can hold a massive amount of water, which they slowly release to plant roots during dry spells. This doesn’t just save your plants; it saves your water bill too. Mycorrhizal fungi move in quickly to help break down these fillers, creating a network that helps your vegetables find nutrients. If you’re using “green” wood that was freshly cut, be aware that it takes longer to break down than “aged” wood. Aged wood is better for your first season because it’s already started the decomposition process.
Carbon-to-Nitrogen Ratios for Beginners
To make this work, you have to balance your “browns” and “greens.” Browns are carbon-rich materials like sticks, dry leaves, and plain cardboard. Greens are nitrogen-rich, like fresh grass clippings or kitchen scraps. If you use too many browns without enough nitrogen, you’ll experience “nitrogen tie-up.” This happens when soil microbes steal nitrogen from your plants to help them digest the wood. The ideal carbon-to-nitrogen ratio for a new raised bed foundation is approximately 30:1 to ensure steady decomposition without stealing nutrients from your plants. By adding a thick layer of green material right on top of your wood, you provide the “battery” the microbes need to get to work.
Sourcing Your Materials: Finding Free and Low-Cost Fillers
Finding the materials for your garden doesn’t mean a trip to the big-box store with a heavy trailer. In fact, most of what you need is likely being thrown away by your neighbors or local businesses right now. The checklist for a free foundation includes plain brown cardboard, fallen logs, dry leaves, and fresh grass clippings. However, you must be a bit of a detective. When sourcing hay or manure from local stables, always ask about “persistent herbicides.” These chemicals can survive the digestive tract of a horse and the composting process, potentially stunting your vegetable plants for years. Safety is the first priority when filling raised beds on a budget.
If you’re unsure about which combinations of “waste” work best for your specific climate, this University of Minnesota Extension guide offers research-backed insights into how these organic layers eventually transform into high-quality soil. It’s a great way to verify that your “junk” is actually building a healthy ecosystem.
The Cardboard Barrier: Your Best Free Tool
Cardboard is the unsung hero of budget gardening. It serves as a biodegradable weed barrier that eventually invites earthworms to the party. Before you toss it in the bed, take five minutes to prep it properly. Remove every piece of plastic tape and any heavy-duty staples. Avoid glossy, colorful boxes; stick to the plain, matte brown shipping containers. By overlapping the edges by at least six inches, you create a seamless base that prevents stubborn grass from poking through your new soil. This simple layer acts as the floor of your “lasagna,” holding moisture while it slowly breaks down.
Community Sourcing Strategies
Think beyond your own fence line. Local coffee shops are often thrilled to give away bags of spent grounds. These are nitrogen gold for your green layers. Local breweries might have spent grain, and many municipalities now offer free compost through leaf-recycling programs. For wood chips, services like ChipDrop connect you with arborists looking to dump a load of mulch for free. Just be prepared; a ChipDrop delivery typically takes between one and five weeks to arrive and results in a massive mountain of material. You might also check social media marketplaces for neighbors giving away “fill dirt,” but always ask where it came from to avoid bringing home invasive pests or construction debris.
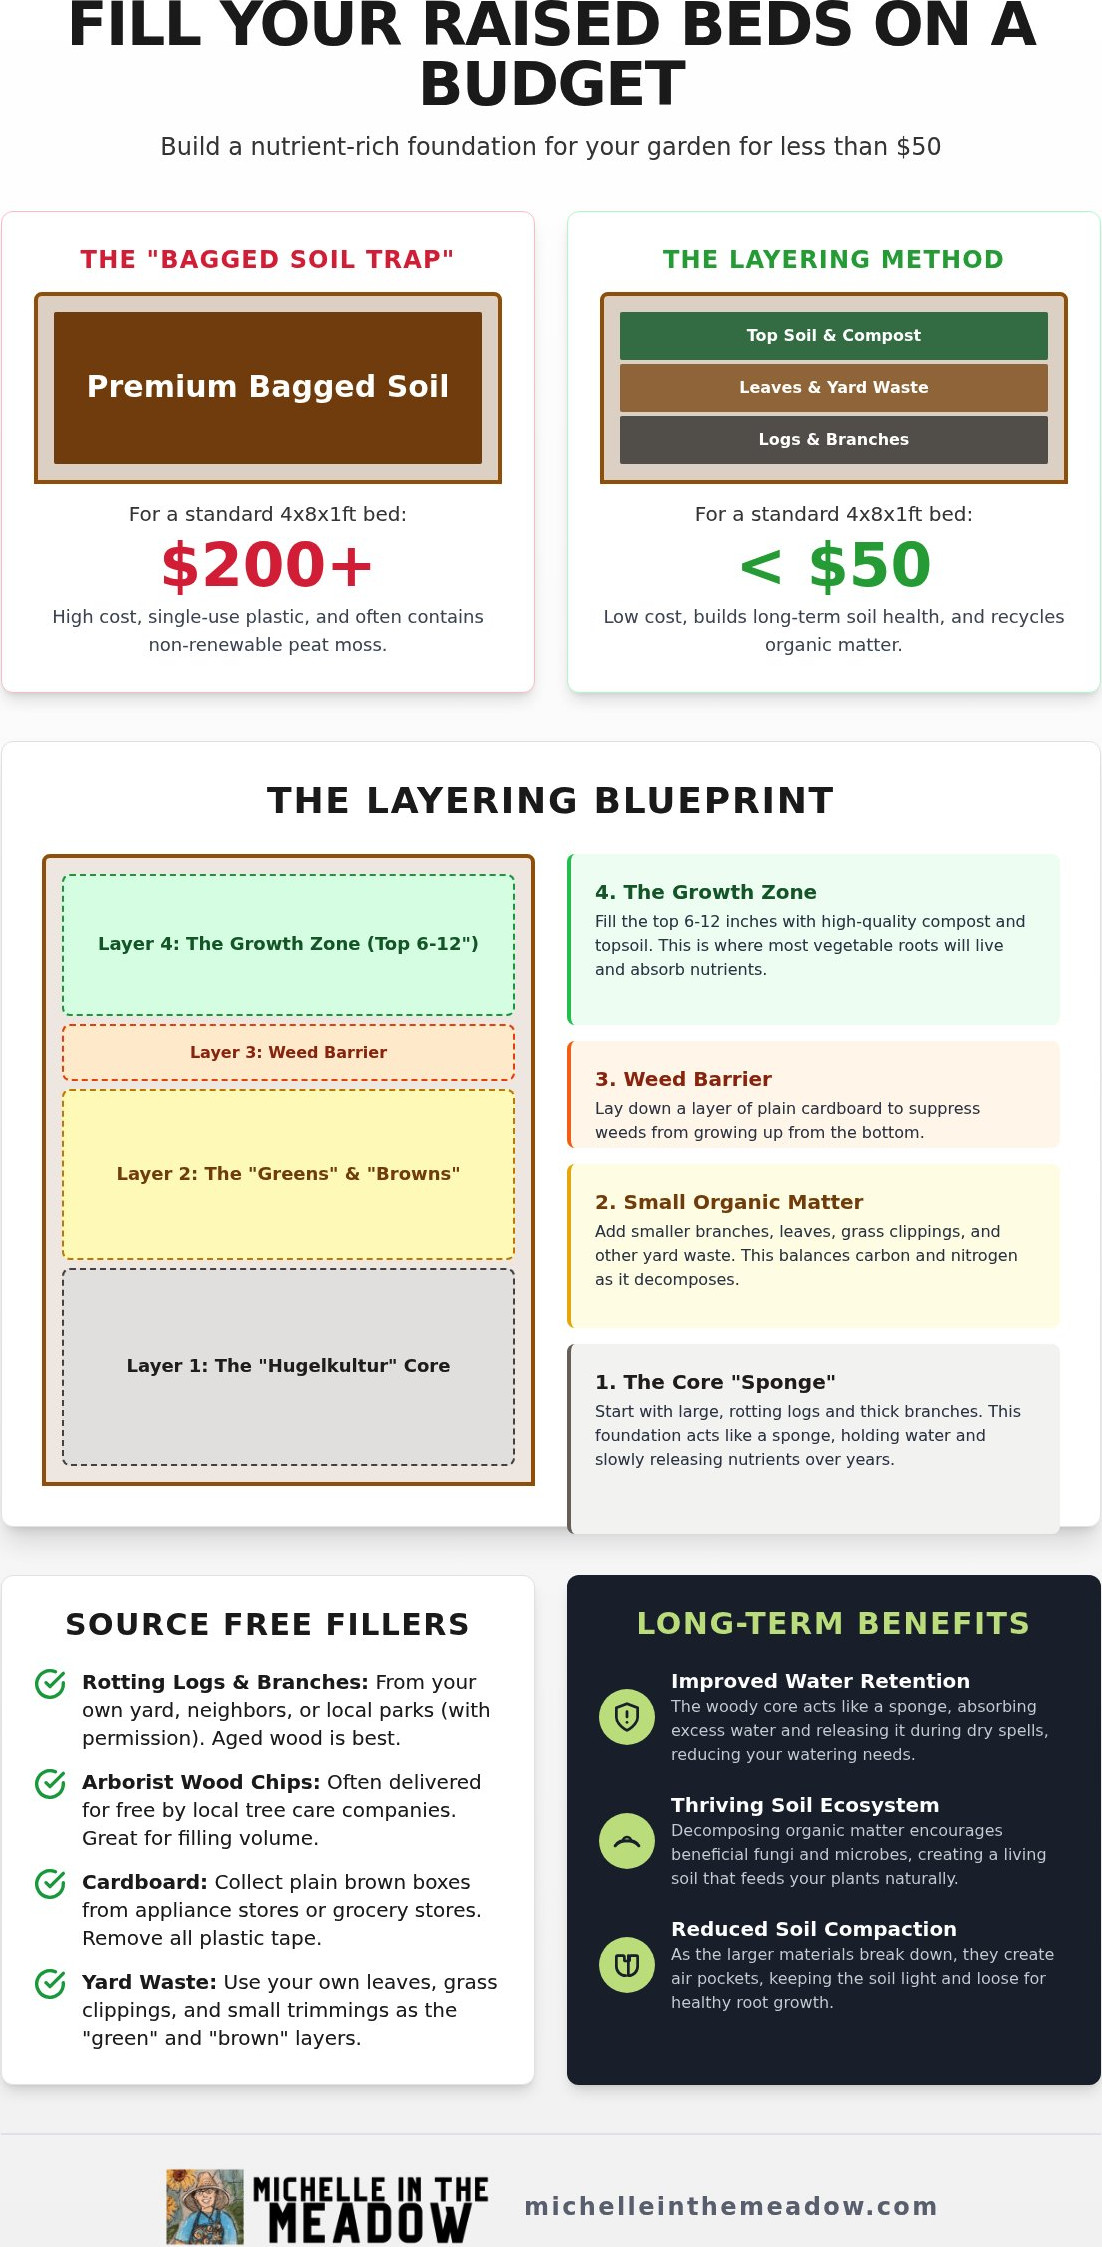
Step-by-Step: The Budget-Friendly Raised Bed Filling Blueprint
Filling raised beds on a budget is a bit like building a house; the foundation is just as important as the roof. If you skip the structural layers at the bottom, your plants won’t have the long-term support they need to thrive. This five-step blueprint is designed to maximize your savings while building a nutrient-rich environment for your vegetables. It’s a methodical process that mimics how soil builds in the wild, turning yard waste into garden gold.
- Step 1: The Foundation Layer. Start with overlapping cardboard to kill grass and weeds. On top of that, place your heaviest logs and thick branches to create the “bones” of your bed.
- Step 2: The Bulk Filler. Add a thick layer of smaller branches, dry leaves, and fresh grass clippings. This is the carbon and nitrogen engine that fuels the decomposition process.
- Step 3: The Buffer Layer. Use partially decomposed compost, aged manure, or even some native soil from a different part of your yard to fill the gaps between the branches.
- Step 4: The Planting Zone. This is the top 6 to 12 inches where your seeds will actually grow. This layer needs to be high-quality, crumbly soil.
- Step 5: Watering and Settling. Once the bed is full, give it a long, deep soak. This encourages the layers to start their transformation into rich loam.
Constructing the Bottom Half
The bottom half of your bed is where you save the most money. For a bed that is 24 inches tall, your foundation and bulk filler should take up at least 14 to 16 inches of that space. Don’t be afraid to get in there and stomp on the layers as you add them. Compression is necessary to prevent the bed from sinking significantly after the first month of gardening. Watering each layer as you build it ensures that moisture reaches the deep wood and helps eliminate air pockets that cause uneven settling.
Mixing the Top 6-12 Inches
The top layer is your planting zone, and it’s the only part that requires a bit of financial investment. You can create a budget version of “Mel’s Mix” by blending equal parts coconut coir, vermiculite, and quality compost. To cut costs even further, replace half of that mix with local screened topsoil from a bulk supplier. This provides the mineral base your plants need at a fraction of the price of specialty bagged mixes. Finally, add a thin layer of wood chip mulch to protect the surface from the sun. Before you start hauling logs, make sure you know exactly how much material to source by using the Soil Calculator for Raised Beds.
Beyond the Fill: Calculating Your Needs and Long-Term Success
Once the physical labor of layering logs and spreading soil is done, you might think the job is finished. However, the true success of filling raised beds on a budget depends on how you manage the bed as it evolves. Organic materials don’t just sit there; they breathe, break down, and eventually shrink. It’s a natural cycle that turns your initial “trash” layers into black gold, but it requires a bit of foresight to keep your plants happy through the transition. If you’ve followed the layering blueprint, you’ve started a biological engine that will feed your garden for years to come.
Planning with the Soil Calculator
Before you order a single yard of dirt or start hunting for logs, you need to know your numbers. Guessing leads to overspending or, worse, a half-filled bed that leaves your seedlings exposed to wind and sun. By entering your bed’s length, width, and height, you can determine the exact cubic yardage required. For budget beds, I suggest splitting this total: calculate the bottom 50 to 60 percent for your free fillers and the remaining top portion for your planting soil. You can try our Soil Calculator for Raised Beds to plan your garden with total confidence, ensuring you only buy exactly what you need and nothing more.
Long-Term Soil Building
One of the best things about this method is that you never have to “replace” your soil. In traditional gardening, soil can become compacted and lifeless over time, but a layered bed is constantly renewing itself from the bottom up. As your foundation settles, which it will do as the wood and leaves decompose, you simply use the “no-dig” method to top it off. Every autumn or early spring, add a few inches of fresh compost or aged manure to the surface. This mimics the natural forest floor and keeps your nutrient levels high without the back-breaking work of tilling or the expense of starting over.
If you notice your plants looking a bit pale or yellowed in the first season, they might be signaling that your budget fill needs a nitrogen boost. This is common when buried wood is still in the early stages of breaking down. You can learn more about Soil Amendments for Raised Beds to help fix these minor nutrient imbalances. To keep the soil active during the winter months, consider planting a cover crop like clover or winter rye. These living roots prevent erosion and naturally pump nitrogen back into the soil, giving you a head start for the next growing season. It’s a quiet, efficient way to maintain a high-yield garden on a shoe-string budget.
Start Your Budget-Friendly Garden Today
Gardening shouldn’t be a luxury reserved for those with a massive budget. By shifting your focus from expensive bags to the natural power of layering, you’ve unlocked a way to grow more for less. We’ve covered how the Hugelkultur method turns backyard debris into a self-watering sponge and how simple community sourcing can provide all the nitrogen your plants crave. Filling raised beds on a budget is ultimately an act of stewardship; you’re recycling waste into a thriving, nutrient-dense home for your vegetables.
Now that you have the blueprint, the next step is to get your measurements right so you don’t overspend on the final planting layer. Our tools have been featured in top gardening resources and are used by thousands of home gardeners who value organic, sustainable practices. Use our Free Soil Calculator to plan your budget garden and take the guesswork out of your project. You’ve got the knowledge and the plan. I can’t wait to see what you grow this season!
Frequently Asked Questions
How much money can I really save by layering my raised beds?
You can typically save 50% to 80% on your total setup costs by choosing a layered approach. Instead of spending hundreds of dollars on premium bagged mixes to fill the entire depth, you only pay for the top few inches of planting soil. This strategy makes filling raised beds on a budget much more accessible for families who want to grow their own food without a massive upfront investment.
Is it safe to use logs and branches from my yard in the bottom of the bed?
Most hardwood logs and branches are excellent for your garden foundation. You should avoid woods like Black Walnut or certain cedar varieties that can prevent other plants from growing. If you use “punky” or partially rotted wood, the decomposition process starts even faster. Just make sure you layer enough nitrogen-rich material on top to prevent the wood from stealing nutrients from your new vegetable starts during the first year.
How long does it take for the bottom layers to turn into soil?
The timeline for decomposition varies depending on your local climate and the type of wood you use. While small twigs and leaves might turn into rich soil within a single growing season, larger logs can take 5 to 10 years to fully break down. This slow decay is actually a benefit because it provides a steady, long-term source of nutrients and moisture for your plants as the years go by.
Can I plant in a newly filled “budget” bed immediately?
Yes, you don’t have to wait for the bottom layers to decompose before you start your garden. As long as you provide a 6 to 12 inch layer of high-quality planting mix on the very top, your vegetables will have everything they need to thrive. The lower layers will act as a moisture reservoir and a future nutrient source while your current crop grows in the finished soil above.
What is the best free material for a nitrogen boost in a new bed?
Fresh grass clippings and spent coffee grounds are the gold standard for free nitrogen. Many local coffee shops are happy to give away their used grounds if you ask nicely. These “greens” are essential for balancing out the “brown” carbon materials like cardboard and logs. Adding a thick layer of these materials directly over your wood foundation helps jumpstart the microbial activity needed for a healthy bed.
Will wood at the bottom of the bed attract termites?
While termites are attracted to decaying wood, they are rarely a threat to your living plants. They are part of nature’s cleanup crew and help break down the logs at the bottom of your bed. To be safe, keep your raised beds at least 10 to 15 feet away from your home’s foundation. This distance ensures that any local termite activity stays in the garden where it belongs.
How do I know if my free manure is safe for vegetables?
The biggest risk with free manure is the presence of persistent herbicides that can kill your vegetables. You can test this by planting a few quick-growing bean seeds in a small pot of the manure. If the beans emerge with twisted leaves or fail to grow, the manure likely contains chemicals. It’s always better to wait and compost the manure yourself for a full year if you are unsure of its origin.
How often do I need to add more soil to a layered bed?
You should expect to add 2 to 3 inches of fresh compost to the top of your bed every year. Because the organic materials in the bottom are constantly breaking down, the soil level will naturally settle. This is a normal part of filling raised beds on a budget. This annual top-dressing keeps the nutrient levels high and maintains the active growth zone needed for a successful harvest every single season.