
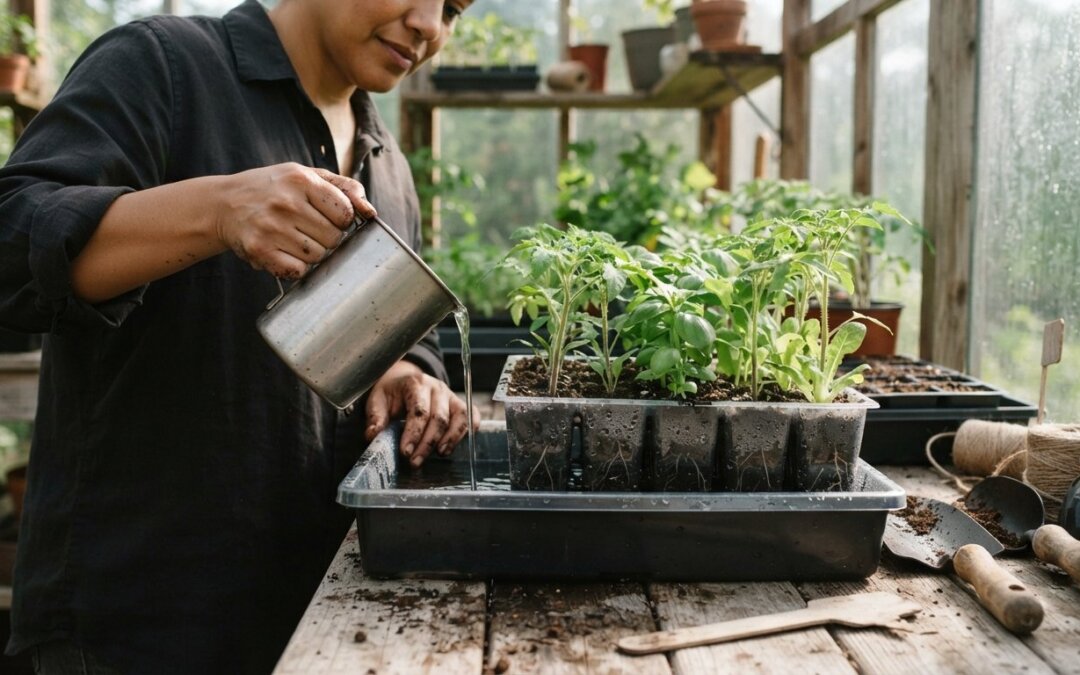
You walk into your garden space, coffee in hand, ready to greet your tiny green sprouts, only to find them slumped over like wet noodles. It’s a heartbreaking sight that many of us know all too well, and usually, the culprit is our watering can. If you’re struggling with moldy soil or uneven moisture, mastering the bottom watering seedlings tray method is the most effective way to turn things around. It’s a simple, resource-efficient shift that stops you from accidentally drowning your plants and starts focusing on where the health really begins: the roots.
I’ve been there, hovering over trays and wondering if I’m doing more harm than good. This guide is designed to take the guesswork out of your morning routine and give you back your confidence. We’ll explore the step-by-step process of hydrating from the bottom up to prevent disease and grow the kind of sturdy, upright plants that thrive once they hit your raised beds. By the end, you’ll have a stress-free watering schedule that saves your seeds and your sanity, ensuring every plant gets the exact amount of moisture it needs to flourish without the mess.
Key Takeaways
- Protect your delicate plants from damping off and surface mold by keeping the top layer of soil dry while hydrating from below.
- Master the bottom watering seedlings tray method using a simple double-tray system to ensure every cell receives perfectly even moisture.
- Understand how capillary action works like a sponge to pull water upward, encouraging deeper and more resilient root growth for a stronger garden start.
- Learn the “pour and wait” technique to avoid common pitfalls like overwatering or shocking young plants with water that is too cold.
- Identify early warning signs of trouble, such as yellowing leaves or algae growth, to keep your seedlings healthy until they are ready for the raised beds.
Why Bottom Watering is a Game-Changer for Seedlings
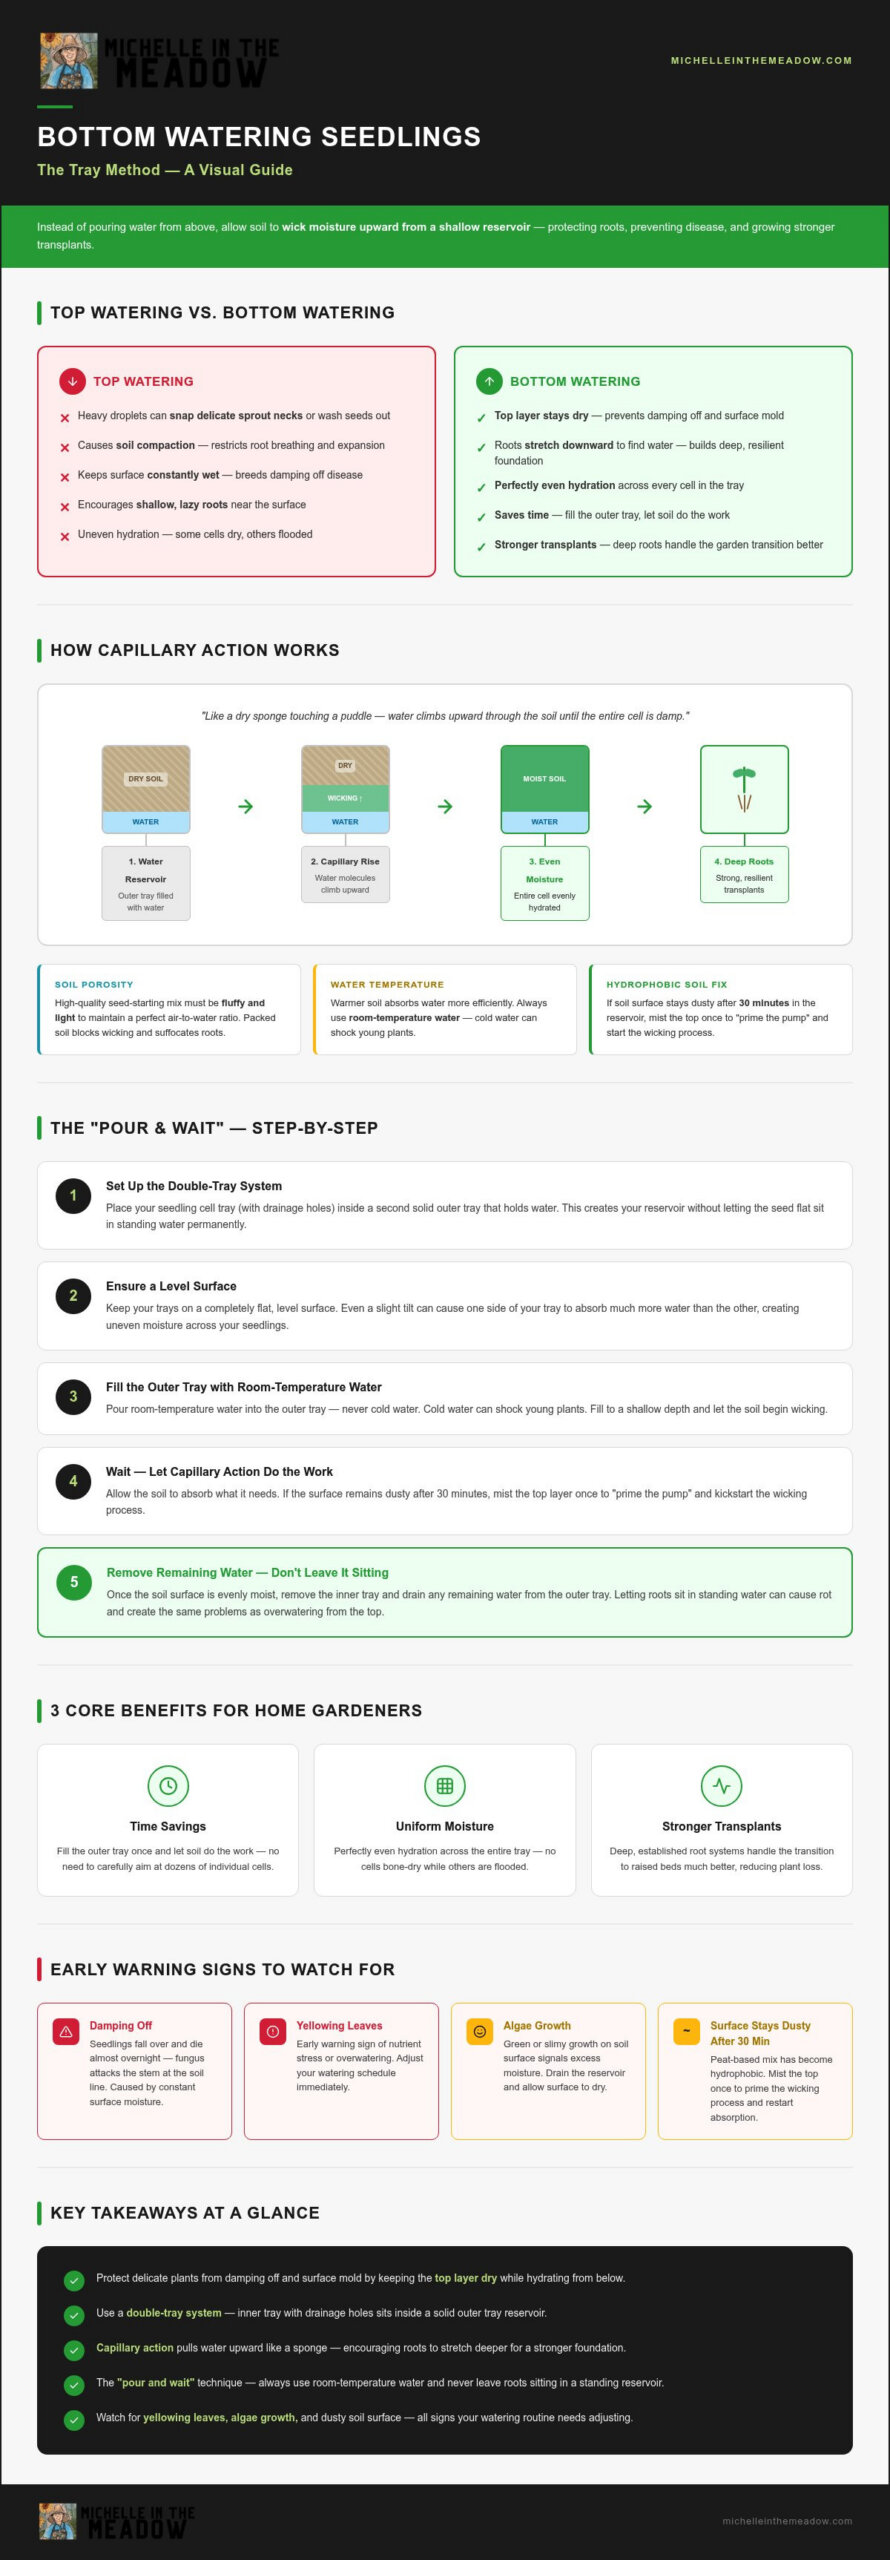
If you’ve ever felt the frustration of watching a tray of promising sprouts suddenly collapse, you’re not alone. It’s often the result of how we water, not how much. The bottom watering seedlings tray method is a simple but powerful shift in how we care for our indoor starts. Instead of pouring water from above, we allow the soil to wick moisture up from a shallow reservoir. This process relies on capillary action, where the soil acts like a sponge, pulling exactly what it needs without disturbing the delicate surface where life is just beginning.
Think of it as a root-first growth philosophy. When water sits at the bottom of the tray, those tiny, searching roots have to stretch downward to find it. This builds a deep, resilient foundation. Top-watering keeps the moisture at the surface, which encourages lazy, shallow roots and leaves the most vulnerable part of the plant, the stem, sitting in a damp environment. By changing the direction of the water, we change the strength of the plant.
The Dangers of Top-Watering Tender Sprouts
Pouring water over the top of a seed flat is like sending a thunderstorm into a nursery. Those heavy droplets can easily snap the delicate necks of new sprouts or wash tiny seeds right out of their holes. Beyond the physical damage, top-watering often leads to soil compaction, which makes it harder for young roots to breathe and expand. The most significant risk, however, is fungal. Constant surface moisture creates a playground for pathogens, specifically the dreaded “damping off” disease. This fungus attacks the stem at the soil line, causing your seedlings to fall over and die almost overnight. Keeping the top layer dry is your best defense against these heartbreaks.
Benefits of the Tray Method for Home Gardeners
Switching to this method isn’t just about plant health; it’s about making your life easier and more efficient. Using the bottom watering seedlings tray method offers several practical advantages for the suburban homesteader:
- Uniform Moisture: It provides perfectly even hydration across the entire tray, so you don’t end up with some cells bone-dry while others are flooded.
- Time Savings: Instead of carefully aiming at dozens of individual cells, you simply fill the outer tray and let the soil do the work.
- Stronger Transplants: Deep, established root systems handle the transition to your garden much better, reducing plant loss during the indoor start phase.
Healthy roots make for happy transplants. By focusing on the soil’s natural ability to wick water, you’re setting your garden up for success before the plants even touch the ground.
Understanding Capillary Action: How the Method Works
Think of a dry kitchen sponge. When you touch the corner of that sponge to a small puddle, the water doesn’t just sit at the bottom; it climbs upward until the entire sponge is damp. This simple magic is the heart of the bottom watering seedlings tray method. In the gardening world, we call this capillary action. It happens because water molecules are naturally “sticky” and want to cling to the tiny surfaces of your potting soil. In a well-aerated mix, these molecules travel through microscopic tunnels, pulling more water behind them until the moisture reaches the top of the cell.
Soil porosity is the secret ingredient that makes this wicking possible. If your soil is packed too tight, there’s no room for water to move or for air to reach the roots. A high-quality seed-starting mix is designed to be fluffy and light, maintaining a perfect air-to-water ratio. This balance is vital because germinating seeds need oxygen just as much as they need moisture. If the soil is waterlogged, the seed can suffocate; if it’s too porous and dry, the germination process simply stops. Temperature also plays a quiet but important role. Warmer soil generally absorbs water more efficiently, which is why using room-temperature water is a best practice when starting seeds indoors.
The Science of the Soil Wicking Process
Water molecules are surprisingly determined, but they need a clear path to follow. One common hurdle for beginners is hydrophobic soil. Many peat-based mixes actually repel water when they become bone-dry. If you notice your tray is sitting in a reservoir but the soil surface remains dusty after thirty minutes, you might need to mist the top just once to “prime” the pump and start the wicking process. It’s also important to keep your trays on a level surface. Even a slight tilt can cause one side of your bottom watering seedlings tray method setup to be flooded while the other stays dry, leading to frustratingly uneven growth across your flat.
Why Uniform Moisture Matters for Germination
A germinating seed is like a tiny engine that can’t be turned off once it starts. It needs constant, steady hydration to survive. Even a small dry pocket in a single cell can kill a sprout in a matter of hours. The tray method creates a consistent environment that leads to an even “stand,” where all your seedlings emerge at roughly the same time. This consistency works beautifully with humidity domes, which trap the moisture as it evaporates, creating a stable mini-greenhouse. As you dream about the harvest to come, using a raised bed soil calculator can help you prepare for the next big step in your gardening journey.
Essential Supplies for the Bottom Watering Tray Method
Setting up for success doesn’t require a commercial greenhouse budget. The bottom watering seedlings tray method relies on a simple “double tray” system. You’ll need one solid outer tray to act as your reservoir and a perforated inner tray or individual cells to hold your plants. When you pour water into the solid base, the holes in the inner containers allow the soil to drink from the bottom. It’s a clean, efficient way to manage moisture without the splash and mess of a traditional watering can.
While many pros love heavy-duty 1020 trays, named for their 10 by 20 inch dimensions, you can easily start with what you have. Recycled yogurt cups or plastic takeout containers work perfectly. Just poke several drainage holes in the bottom. This resource-efficient approach is the heart of suburban homesteading. It’s about using what’s available to grow something beautiful. Make sure your inner containers are deep enough to sit firmly in the water while keeping the stems high and dry.
Choosing the Right Seed Starting Trays
Standard 1020 trays are popular because they fit most heat mats and grow lights. However, depth is actually more important when using the bottom watering seedlings tray method. A tray that’s at least two inches deep gives the soil enough vertical space to pull moisture upward effectively. If you’re using soil blocks instead of plastic cells, the same double-tray logic applies. The blocks sit directly in the reservoir, drawing water through their base. Regardless of the container, your success depends on using the Best Potting Soil for Seedlings. Heavy garden soil will just turn into a muddy mess that blocks airflow and kills delicate roots.
Preparing Your Seed Starting Mix
Before you even touch a seed, you need to prep your mix. I always recommend pre-moistening your soil in a bucket until it feels like a wrung-out sponge. Dry peat moss and coco coir are notoriously stubborn. They often float on top of water rather than absorbing it. By hydrating the mix first, you ensure the capillary action starts immediately. Look for mixes containing perlite or vermiculite. These ingredients create the tiny air pockets necessary for wicking. As you plan your spring transitions, our Soil Calculator is a great tool to help you estimate how much organic matter you’ll need for your larger garden beds later in the season.
Step-by-Step Guide to Bottom Watering Your Seedlings
Once you have your supplies ready, the bottom watering seedlings tray method becomes a quiet, meditative part of your morning routine. Success starts with a clean environment. Before you begin, ensure your outer reservoir tray is free of old soil or debris, as stagnant water can quickly harbor pathogens. Always use room-temperature water. Pouring ice-cold tap water into your tray can shock the tender root systems we’ve worked so hard to encourage, potentially stalling growth for days.
The “Pour and Wait” technique is exactly as simple as it sounds. Add about half an inch to an inch of water into your solid base tray. You don’t need to submerge the cells; you just need enough for the bottom of the pots to make contact. As the soil begins to wick, you’ll see the surface of the mix turn from a dusty light brown to a rich, dark chocolate color. This visual change is your signal that the moisture has traveled all the way through. Once the top feels damp, the most critical step begins: the drain stage. Never leave your seedlings sitting in a pool of water for hours. After the soil is saturated, pour out any excess liquid. This ensures the roots have access to the oxygen they need to breathe.
The “Goldilocks” Timing: How Long to Soak
For most standard seed trays, the sweet spot for soaking is between 15 and 30 minutes. If you’re working in a very dry room or using high-intensity grow lights, the soil might drink faster than on a humid, cloudy day. Peat-based mixes often take a few extra minutes to “wake up” compared to coco coir. To be certain, you can use the finger test: press your tip gently to the soil surface; if it feels cool and damp but doesn’t leave a muddy residue on your skin, your seedlings are perfectly hydrated.
Frequency and Monitoring Tips
The easiest way to know when to water again is to simply lift your tray. A hydrated tray feels heavy and substantial, while a dry one will feel surprisingly light, almost like it’s filled with air. You’ll also notice the soil slightly pulling away from the plastic edges of the cells when it’s time for a refill. As your plants develop their first set of “true leaves,” their thirst will increase significantly. Keep a close eye on them during this stage, as they’ll begin to process water much faster than they did as tiny sprouts. For more help managing your garden’s needs, explore our gardening educational content to find more resource-efficient growing tips.
Troubleshooting Common Bottom Watering Mistakes
Learning the bottom watering seedlings tray method is a huge step toward gardening independence, but it isn’t a “set it and forget it” system. One of the most common hiccups I see is overwatering. It’s tempting to leave water in the tray “just in case,” but this often leads to stagnant growth and yellowing leaves. Those yellow tips are a cry for help; they mean the roots are suffocating and can’t take up nutrients. If you see this, skip the next watering cycle and let the tray dry out until it feels light again.
You might also notice a green or white fuzz appearing on your soil. Algae and mold thrive in the same damp conditions your seedlings love, but they signal a lack of airflow. While they don’t always kill a plant, they compete for resources. Keeping the top millimeter of soil dry is a brilliant “Dry Top” strategy. It deters pests and keeps the surface clean. You can also try bottom-feeding your nutrients by adding a weak liquid fertilizer directly into the tray. This ensures the food goes straight to the roots, though you should occasionally flush with plain water to prevent salt buildup.
Managing Fungus Gnats and Surface Mold
Fungus gnats are the bane of every indoor gardener. These tiny black flies lay their eggs in the top layer of damp soil. By using the bottom watering seedlings tray method, you’re already halfway to winning the battle because the surface stays drier than with top-watering. To finish the job, set up a small oscillating fan. The moving air dries the surface and strengthens the stems. If they persist, a light dusting of cinnamon or a thin layer of sand acts as a natural barrier that stops the gnats from reaching the soil.
When Bottom Watering Isn’t Enough
Sometimes, life gets busy and the soil becomes so dry it turns “crusty” and pulls away from the cell walls. In this state, the mix can become hydrophobic, meaning it actually repels water from the bottom. If you see the water sitting in the tray for an hour without being absorbed, you’ll need to step in. A very gentle misting from the top can “prime” the soil, breaking the surface tension and allowing the wicking to begin again. For more tips on getting your garden off to a perfect start, check out our guide on Seed Starting for Beginners. Don’t be discouraged by these small hurdles; every mistake is just a lesson that makes you a more capable grower.
Ready for a Stronger Garden Start?
Shifting your routine to the bottom watering seedlings tray method is more than just a way to keep things tidy. It’s a fundamental change in how you build plant resilience from day one. By encouraging roots to search for moisture and keeping the soil surface dry, you’re effectively closing the door on damping off and surface mold. This resource-efficient approach saves you time and protects your investment in seeds, ensuring that when the weather finally warms, your transplants are sturdy enough to thrive in their new home.
I’ve spent years refining these tried-and-tested methods for suburban homesteaders, focusing on organic and sustainable practices that work for every budget. If you’re looking for the right tools to get your next tray started, check out my favorite seed starting supplies on Michelle In The Meadow. Growing your own food is a journey we’re on together, and these small, practical steps make all the difference. Happy planting, and I can’t wait to see what you grow this season.
Frequently Asked Questions
How long should I leave my seedlings in the water tray?
You should typically leave your seedlings in the water tray for 15 to 30 minutes. This is usually enough time for the soil to wick moisture to the surface without becoming waterlogged. If the soil still feels dry on top, give it ten more minutes. Always remember to drain any leftover water once the soil surface looks dark and damp. Leaving them in standing liquid for hours can quickly lead to root rot.
Can I bottom water seedlings every day?
You shouldn’t bottom water every single day. Instead, wait until the tray feels light or the soil surface begins to look pale. Overwatering is a common mistake that leads to yellow leaves and weak stems in young plants. Most indoor seedlings only need a deep soak every two to three days, depending on the humidity and light levels in your home. Always check the weight of the tray before adding more water.
Why is the top of my soil still dry after bottom watering?
If the top of your soil stays dry, your potting mix might be hydrophobic. This happens when peat-based soils become so dry they actually repel water. You can fix this by gently misting the top once to “prime” the wicking process. Also, ensure your trays are perfectly level. If the tray is tilted, the water won’t reach every cell evenly, leaving some corners of your bottom watering seedlings tray method setup bone-dry.
Does bottom watering prevent fungus gnats?
Yes, the bottom watering seedlings tray method is an excellent tool for preventing fungus gnats. These pests lay their eggs in the top layer of damp soil, so keeping that surface dry makes your trays much less attractive to them. While it isn’t a 100% guarantee, combining this method with a small fan for better airflow creates a hostile environment for gnats, helping you avoid the need for harsh chemical treatments.
Can I use the tray method for soil blocks?
Absolutely, bottom watering is actually the preferred way to hydrate soil blocks. Since these blocks have no plastic walls to hold them together, top-watering can cause them to crumble or erode over time. Placing them in a solid tray and letting them wick moisture from the base keeps the blocks structurally sound. It’s a resource-efficient way to grow, as it eliminates the need for plastic cells while ensuring even hydration for every block.
Should I add fertilizer to the bottom watering tray?
You can certainly add liquid fertilizer to your tray, which is often called “bottom feeding.” It’s a great way to ensure nutrients reach the roots directly without getting stuck on the soil surface. However, you should use a very diluted organic fertilizer to avoid salt buildup. Every few waterings, use plain, room-temperature water to flush the system. This keeps the soil chemistry balanced and healthy for your growing sprouts as they prepare for the garden beds.
What happens if I forget to drain the excess water?
If you forget to drain the excess water, your seedlings are at high risk for root rot. Roots need oxygen to thrive, and sitting in stagnant water for too long effectively drowns them. You’ll likely notice the leaves turning yellow or the stems becoming mushy. If this happens, drain the tray immediately and place it in a warm spot with good airflow to help the soil dry out.
Is tap water okay for bottom watering seedlings?
Tap water is generally fine for most seedlings, but it’s best to let it sit out for 24 hours first. This allows chlorine to dissipate and ensures the water reaches room temperature. Cold water directly from the tap can shock young roots and slow down their growth. If you have very hard water, you might notice white mineral crusts on your soil over time, but for most home gardeners, aged tap water works well.
