
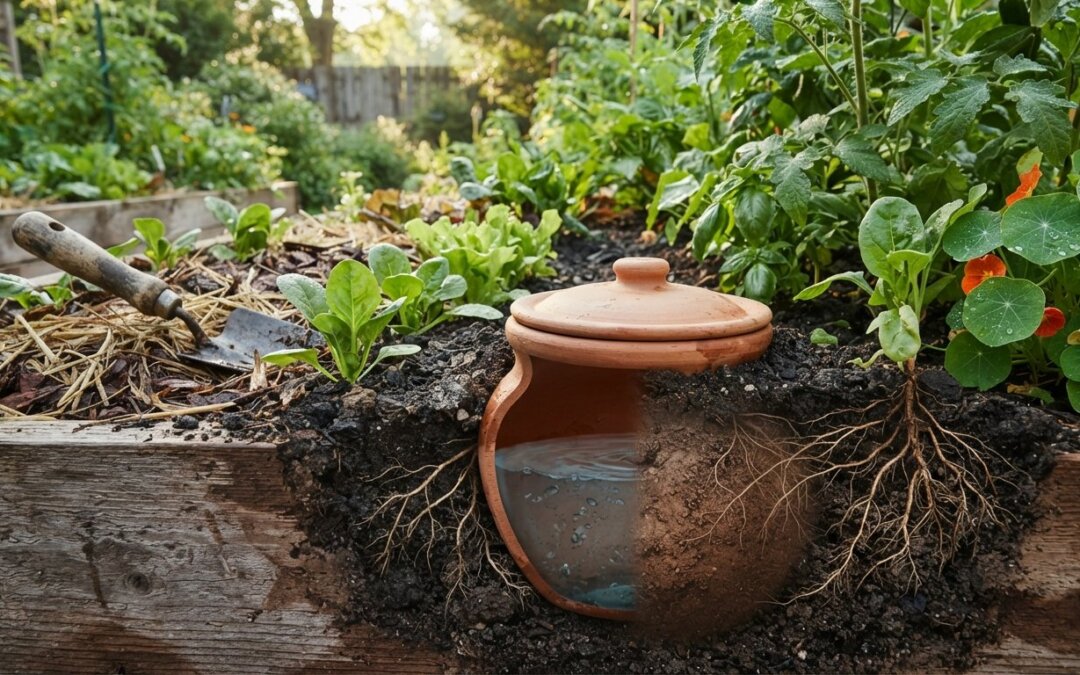
What if the traditional way we water our plants is actually the most wasteful thing we do in the garden? It’s a frustrating cycle. You stand out in the heat with a hose, yet by mid-afternoon, your squash is wilting and the weeds are thriving on that surface moisture. Most of us have felt that pang of guilt when a high water bill arrives or when a short trip away results in a bed of crispy tomatoes. Using olla irrigation pots for vegetable gardens changes the entire dynamic by moving the water where it actually belongs: deep underground.
I know how much you care about your soil and the health of your harvest, and I agree that the constant battle against evaporation feels like a losing game. I promise that by the end of this article, you’ll see how these ancient clay vessels can slash your water usage by up to 70% while encouraging the deepest, most resilient root systems you’ve ever seen. We’re going to explore the simple physics of soil moisture tension, how to choose the right size for your specific beds, and why this low-tech solution is the key to a self-regulating garden in 2026.
Key Takeaways
- Learn how to reduce your garden’s water consumption by up to 70% using a hands-off approach that mimics nature’s own cycles.
- Discover how ancient technology translates to modern success when using olla irrigation pots for vegetable gardens to eliminate surface evaporation and runoff.
- Understand the science of soil moisture tension and how it encourages your plants to develop deeper, more resilient root systems that can withstand the summer heat.
- Master the simple installation steps and refill schedules that allow you to step away from your garden for days at a time without worrying about wilting.
- Find out how to apply the “Radius Rule” to ensure every vegetable in your raised beds receives the precise amount of hydration it needs to thrive.
What Are Olla Irrigation Pots? Ancient Technology for Modern Gardens
At its core, an olla is a simple, unglazed clay vessel designed to be buried deep within your garden beds. While it might look like a standard terracotta pot at first glance, its purpose is entirely different. Instead of acting as a container for a plant, it serves as a subterranean reservoir. This technology isn’t a modern invention. In fact, historians trace ancient olla clay pot irrigation back over 4,000 years to regions in ancient China and North Africa. It’s arguably the world’s first “smart” irrigation system, relying on the laws of physics rather than sensors or batteries to keep your vegetables hydrated.
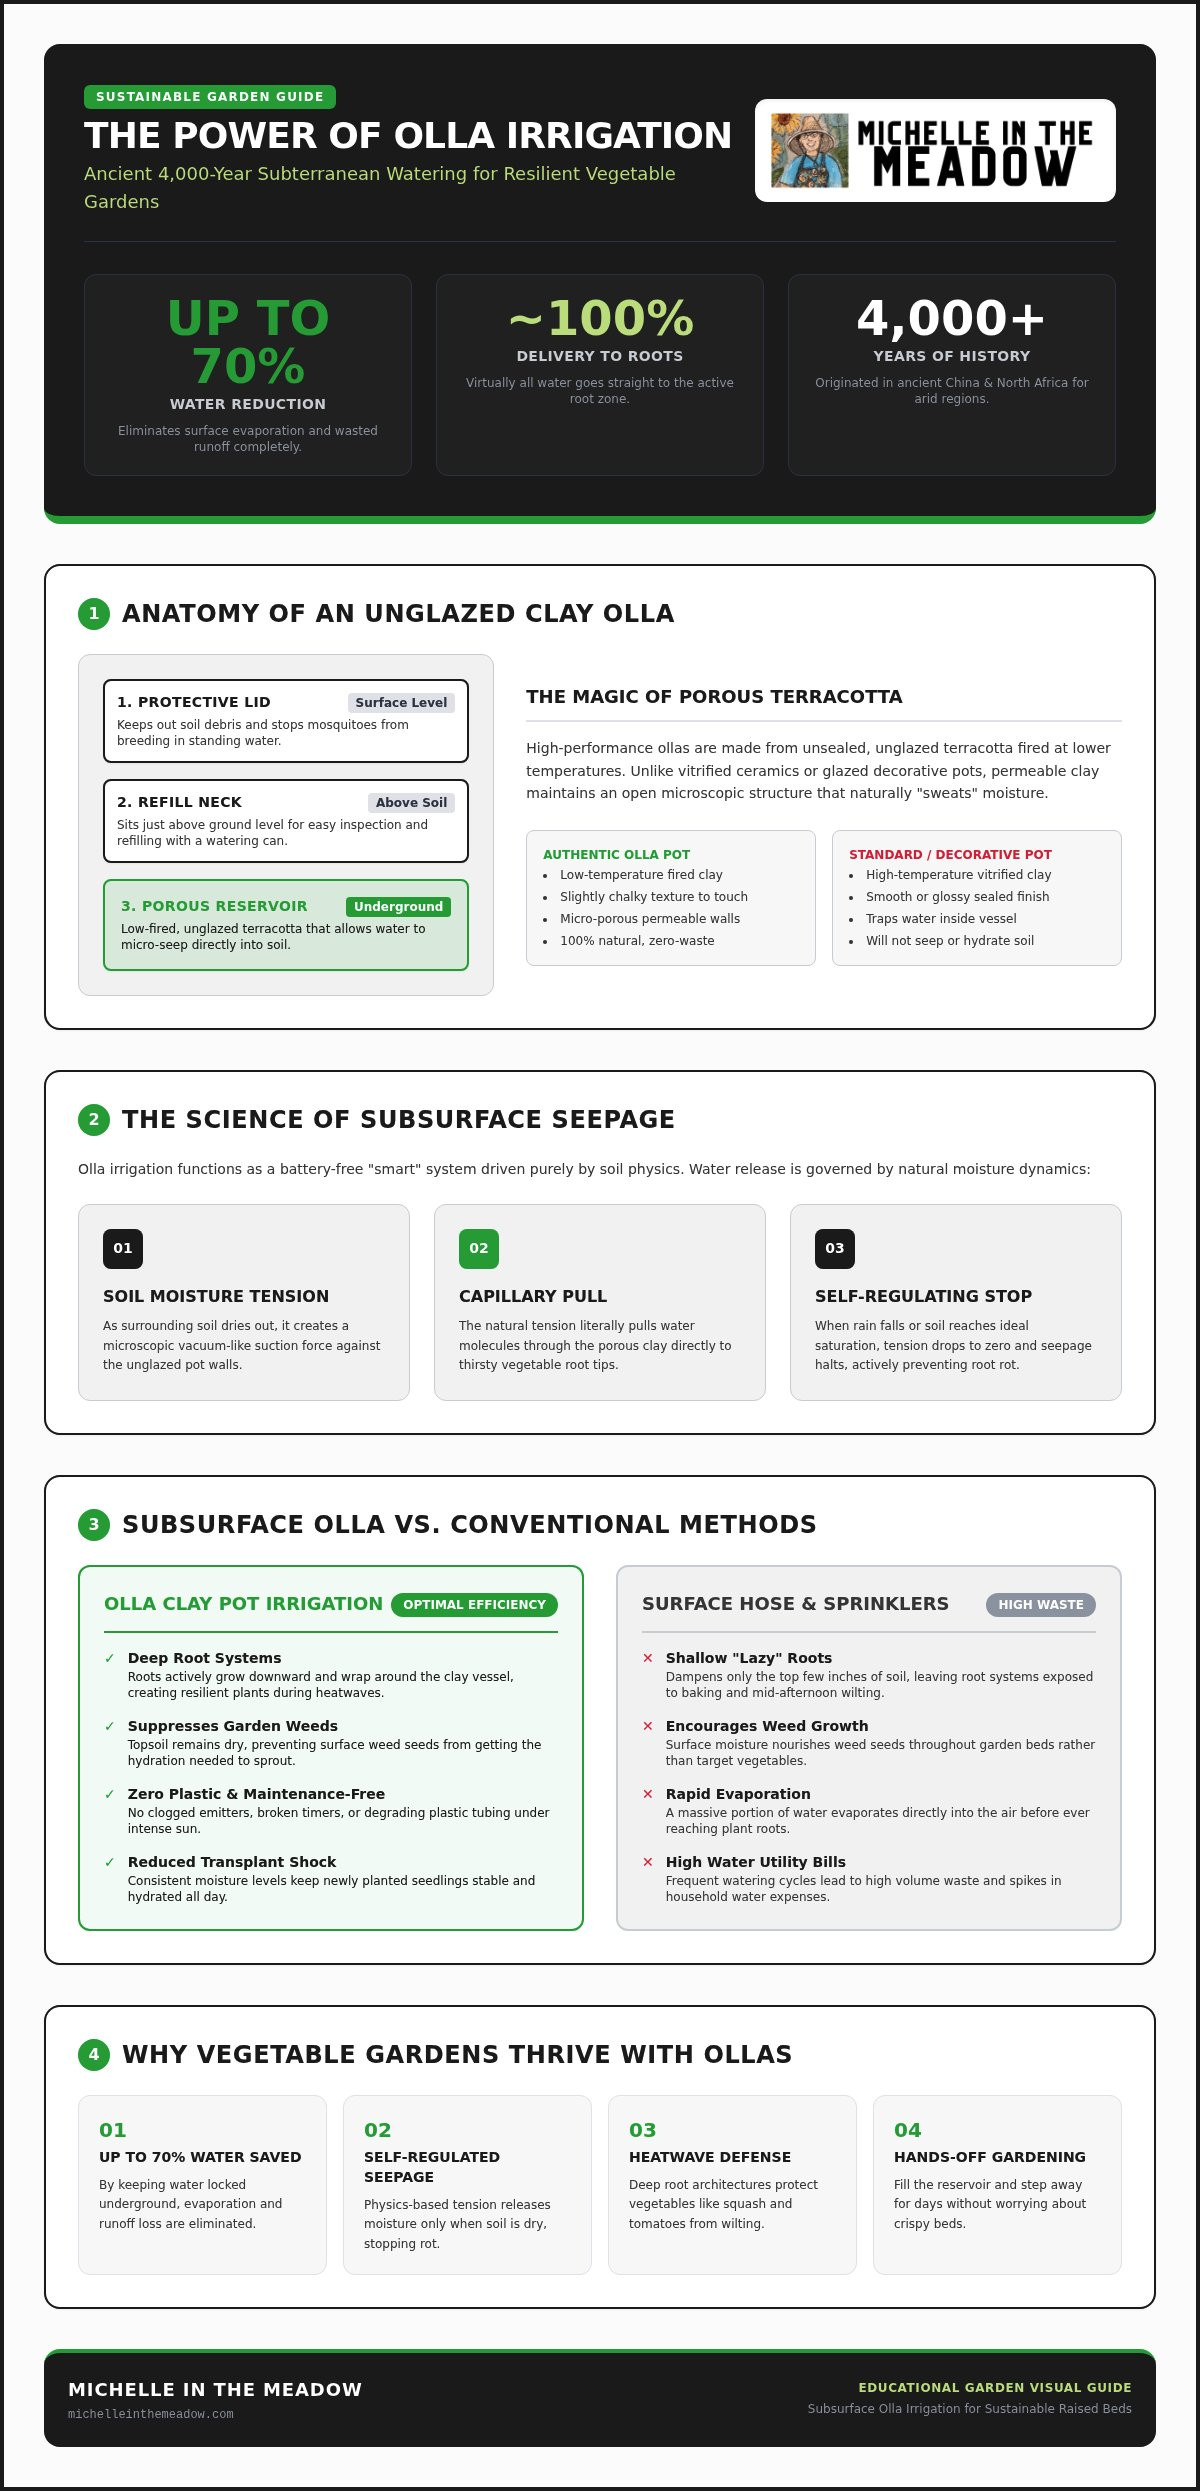
The anatomy of an olla is remarkably straightforward. You have the wide reservoir, which sits underground and holds the water. Then there’s the neck, which stays just above the soil surface for easy refilling. Finally, a lid or cap sits on top. This lid is vital. It keeps out debris and prevents mosquitoes from breeding in the standing water. When you use olla irrigation pots for vegetable gardens, you’re stepping into a long tradition of resourcefulness that has sustained crops in arid climates for centuries.
The Magic of Porous Terra Cotta
The secret to this system lies in the unglazed terra cotta. Because the clay hasn’t been sealed with glass or paint, it remains porous. Water doesn’t just sit trapped inside; it slowly seeps through the walls at a microscopic level. The firing temperature during the making process is critical here. If the clay is fired at too high a temperature, it becomes vitrified and loses its ability to “sweat.” High-quality ollas are fired at lower temperatures specifically to maintain this permeability. When you’re shopping, look for pots that feel slightly “chalky” to the touch. If a pot is shiny or decorative, it likely won’t work for irrigation.
Olla vs. Drip Irrigation: Which Is Better?
Drip irrigation is popular, but it often comes with a tangled mess of plastic tubes, emitters, and timers. For many of us working with small-scale raised beds or containers, ollas offer a much simpler path. There are no clogged lines to fix and no plastic to degrade under the 2026 summer sun.
Choosing olla irrigation pots for vegetable gardens is a zero-waste alternative to traditional systems. While drip lines can be expensive and complex to install, an olla just requires a hole and a watering can. It provides a level of consistent hydration that’s hard to match. It ensures your soil stays moist without the high-maintenance headache of a mechanical system.
The Science of Seepage: How Clay Pots Regulate Soil Moisture
How do these simple clay vessels actually “know” when to release water? It isn’t magic; it’s physics. Soil moisture tension is the quiet driving force behind the whole system. When the soil around the buried pot dries out, it creates a microscopic vacuum-like pull. This tension literally sucks water through the porous clay walls. It’s a beautiful, natural process that happens entirely out of sight, ensuring your plants never have to wait for the next scheduled watering session.
This process is supported by capillary action. As your plants drink, they deplete the moisture in the soil, which increases the tension and pulls more water from the reservoir. If the soil is already saturated from a heavy summer rain, the tension drops, and the water stays safely inside the pot. This self-regulating nature is why using olla irrigation pots for vegetable gardens is so effective at preventing root rot. According to Colorado State University Extension’s guide to olla pots, this subsurface method ensures that almost 100% of the water you use actually reaches the plant’s roots instead of vanishing into the air. This efficiency is why many gardeners see their water bills drop significantly after the first season.
Deep Root Growth and Plant Health
Most of us are used to standing over our beds with a hose, but that only dampens the top few inches of soil. This leads to lazy, shallow roots that bake and wither in the sun. Because an olla releases water deep in the ground, roots are forced to grow downward and wrap themselves around the clay. This makes your vegetables much hardier during a heatwave. You’ll also notice less transplant shock when you move seedlings into a bed with a pre-installed olla, as the moisture levels remain perfectly consistent throughout the day.
Reducing Weeds and Disease
One of my favorite side effects of this system is the lack of weeds. Most weed seeds need light and surface moisture to germinate. Using olla irrigation pots for vegetable gardens is a simple way to keep the top layer of soil dry, essentially starving those pesky weeds before they even start. Additionally, you aren’t splashing water onto the leaves of your tomatoes or cucumbers. This significantly reduces the risk of fungal diseases like powdery mildew or blight, which often start with wet foliage. It’s about creating a stable, healthy microbial environment right where the roots can access it.
If you’re planning a new layout for your garden beds, you might want to check out some curated gardening product recommendations to find the right size pots for your specific space.
Why Ollas Are a Game-Changer for Vegetable Gardens
If you’ve ever watched your prized beefsteak tomatoes split because of inconsistent watering, you know the frustration. It’s a common heartbreak for gardeners. One day the soil is bone dry, and the next it’s a swamp after a heavy-handed watering session. Using olla irrigation pots for vegetable gardens solves this by providing a steady, gentle supply of moisture that heavy feeders like cucumbers and squash crave. Instead of the daily chore of lugging a heavy hose, you only need to check and refill the reservoir every 3 to 7 days, depending on how hot the 2026 summer gets.
The UC Agriculture and Natural Resources guide to olla irrigation highlights how this suction pressure method prevents the stress cycles that stunt plant growth. This consistency doesn’t just keep plants alive; it leads to noticeably higher yields and a significantly lower monthly water bill. By delivering water directly to the root zone, you stop paying for water that simply evaporates off the surface before the plant can even use it.
Perfect for Raised Bed Gardening
Raised beds are fantastic for drainage and soil control, but that same drainage means they dry out much faster than in-ground plots. It’s a trade-off we all deal with. However, a single medium-to-large olla can effectively hydrate a 3×3 foot area, making it a perfect fit for standard bed dimensions. When you’re using my Soil Calculator for Raised Beds to plan your growing season, remember that the high-quality organic mix you’re calculating works hand-in-hand with an olla. The porous soil allows the water to travel efficiently through the bed, maximizing the hydration radius for every seedling.
Suburban Homesteading Efficiency
For those of us balancing a busy life with a backyard garden, time is our most precious resource. Ollas act as a silent partner in the meadow. They allow you to take that weekend getaway without coming home to a graveyard of crispy greens. It’s a zero-electricity, zero-plastic solution that fits perfectly into a sustainable lifestyle. You aren’t relying on complex timers that might fail or plastic drip lines that eventually crack and shed microplastics. It is just you, the clay, and a much shorter daily to-do list. This simple shift reduces your environmental footprint while giving you back your morning coffee time.
How to Install and Maintain Your Olla System
Installing olla irrigation pots for vegetable gardens is a rewarding afternoon project that pays off almost immediately. To get started, dig a hole in your garden bed that is roughly twice the width of your clay pot. Position the vessel so the neck remains one or two inches above the soil line. This prevents dirt from falling inside while making it easy to spot when you’re walking through the garden with a watering can. Once it’s in place, backfill the hole with high-quality organic soil. It’s vital to press the soil firmly against the sides of the pot to eliminate air pockets, ensuring the water can seep directly into the earth.
After the pot is secure, fill it to the brim with water and immediately place the lid on top. This lid is your best defense against evaporation and helps keep the water clean from debris. For most olla irrigation pots for vegetable gardens, you’ll only need to refill the reservoir every three to seven days. During the peak of the 2026 summer, check the levels more frequently to get a feel for how thirsty your specific crops are. You’ll quickly learn the rhythm of your plants as they pull what they need from the clay.
DIY vs. Store-Bought Ollas
Many budget-conscious gardeners enjoy the “Two-Pot” DIY method. This involves gluing two standard terracotta pots together with food-safe silicone sealant. Doing this is a great entry point if you’re testing the waters. However, keep in mind that professional-grade ollas are often fired at specific lower temperatures to ensure the most even seepage possible. While DIY versions are affordable, they can occasionally leak at the seams or be less porous than a vessel designed specifically for irrigation. If you want the best results for your harvest, you can explore my curated gardening product recommendations to find high-quality, durable options.
Winterizing and Long-Term Care
Clay is a natural material that reacts to the environment. If you live in a climate where the ground freezes, you must dig up your ollas before the first hard frost. Water expands as it turns to ice, which will easily shatter a buried clay pot. Once you’ve removed them, give them a simple vinegar soak to clear out any mineral buildup or salt deposits that might be clogging the pores. This keeps the seepage rate consistent year after year. Inspect the walls for any hairline cracks and ensure your lids still provide a snug seal before storing them in a dry place for the winter. A little bit of care in the off-season ensures your system remains a reliable partner for years to come.
Choosing the Right Size and Plants for Your Olla Garden
The success of your underground irrigation depends heavily on understanding the “Radius Rule.” Simply put, water doesn’t travel the same distance in every garden. If you’re working with clay-heavy soil, the water spreads further horizontally because the dense particles hold onto moisture. Sandy soil is a different beast. Because water moves vertically through sand much faster than it spreads sideways, you’ll want to tuck your plants a little closer to the pot than you would in a loam-heavy bed. Ideally, you should center your olla and place four to six plants around it to ensure everyone gets a fair share of the reservoir.
Matching the size of your olla to your space is just as important. A small one-quart vessel is perfect for a patio container, but a large raised bed needs something more substantial. When you use olla irrigation pots for vegetable gardens, you’re essentially creating a moisture “bubble” underground. If the pot is too small for the space, the plants on the edges will still be thirsty. If it’s too large for a small container, you won’t have enough room for the soil and roots. It’s all about finding that balance between the water volume and the root zone you need to hydrate.
Which Vegetables Love Ollas Most?
Not all crops are created equal when it comes to subsurface watering. Heavy feeders and vining crops are the absolute stars of an olla-fed garden. These plants have aggressive, thirsty root systems that will quickly find the clay walls and wrap around them. I’ve found that the following crops perform exceptionally well:
- Tomatoes and Peppers: These plants thrive on the consistent moisture that prevents blossom end rot.
- Cucumbers and Melons: Vining plants love the deep hydration, and keeping their leaves dry helps prevent powdery mildew.
- Squash and Eggplants: These large-leaved plants transpire a lot of water and appreciate the steady supply.
Leafy greens and shallow-rooted herbs like cilantro can still benefit, but they might need a little extra help. Since their roots stay near the surface, they might not reach the olla’s moisture bubble during the first few weeks of growth. I usually give them a light surface watering until they’re well-established.
Planning Your Garden Layout
Designing your layout around a reservoir is a bit different than planting in straight rows. Many gardeners prefer a “Circle Garden” design, where the olla is the heart of the bed and plants radiate outward. This is also a fantastic addition to a Square Foot Gardening grid; you can simply dedicate the center squares to your pots and plant the surrounding squares accordingly. For a standard 2-gallon olla pot, you can expect a reliable planting radius of approximately 12 to 18 inches from the center of the vessel in most garden soils. This strategic placement ensures that your olla irrigation pots for vegetable gardens are working at peak efficiency, giving you a lush harvest with a fraction of the effort.
Your Path to a Thriving, Low-Maintenance Harvest
Embracing this ancient clay technology isn’t just about saving time; it’s about building a more resilient, earth-friendly garden that works with nature instead of against it. Whether you choose to build your own or invest in professional-grade vessels, the result is a 2026-ready garden that thrives on deep roots and consistent hydration. You’ve seen how olla irrigation pots for vegetable gardens can slash your water bill while protecting your heavy feeders like tomatoes and squash from the stress of summer heat. It’s a simple shift that yields a higher organic harvest with much less manual labor.
I’m excited for you to experience that first morning where you can just sit with your coffee and watch your garden grow, knowing the hard work is happening quietly beneath the surface. It is a beautiful way to reclaim your time while staying committed to sustainable, organic practices. To get started on the right foot, check out my favorite organic gardening supplies for your olla setup! You’ve got this, and I know your plants will thank you for the steady, cool drink.
Frequently Asked Questions
How often do I need to refill my olla irrigation pot?
Most gardeners find they need to refill their pots every 3 to 7 days. This frequency varies based on the 2026 summer heat and how established your plants are. If you’re growing thirsty crops like melons in sandy soil, you might check them twice a week. In cooler weather or clay-heavy soil, a large reservoir can often last a full week. It’s a much more relaxed schedule than daily hose watering.
Can I use liquid fertilizer inside an olla pot?
It’s best to avoid putting liquid fertilizer directly into the reservoir. Over time, the minerals and organic matter in the fertilizer can clog the tiny pores in the clay, reducing the pot’s efficiency. To keep your olla irrigation pots for vegetable gardens working perfectly, apply compost tea or organic liquid feeds directly to the soil surface instead. This keeps the clay clean and ensures the water continues to seep through at a steady rate.
Will olla pots crack in the winter if I leave them in the ground?
Yes, they will likely crack if you live in a region where the ground freezes. Water trapped in the clay walls or the reservoir expands as it turns to ice, which puts immense pressure on the terracotta. If your winter temperatures drop below freezing, you should dig up your pots, clean them, and store them in a dry shed or garage. This simple step protects your investment and ensures the pots are ready for the next spring.
What size olla do I need for a 4×4 raised garden bed?
For a standard 4×4 raised bed, I recommend using two large ollas placed about two feet apart. A single large pot usually has a wetting radius of about 12 to 18 inches, so one pot in the center might leave the corners of a 4×4 bed too dry. By using two, you ensure that the moisture bubbles overlap, providing consistent hydration for every plant in the bed. This setup works beautifully for high-density vegetable planting.
Do olla pots attract mosquitoes or garden pests?
They shouldn’t attract pests if you keep the lid securely in place. An open olla neck is an invitation for mosquitoes to lay eggs in the stagnant water, but a simple rock or a matching clay lid solves this completely. Because the soil surface stays dry, you’ll actually notice fewer pests like slugs and snails that thrive in damp surface conditions. It’s a much cleaner way to manage your garden’s moisture levels without inviting unwanted guests.
Can I use an olla pot for indoor houseplants or just outdoor gardens?
You can absolutely use smaller versions for your indoor houseplants. While the technology was originally used for outdoor agriculture, the physics of soil moisture tension works just as well in a decorative pot on your windowsill. It’s a fantastic solution for plants that are sensitive to overwatering, as the plant only pulls the moisture it needs. Just make sure the olla is sized appropriately for the container so it doesn’t displace too much soil.
How do I know if my olla pot is actually watering my plants?
The easiest way to tell is by monitoring the water level inside the neck. If the level drops over a few days, you know the water is seeping into the soil. You’ll also see your plants leaning toward the pot as their roots gravitate to the moisture source. If the soil a few inches away from the pot feels cool and slightly damp beneath the surface, your olla irrigation pots for vegetable gardens are doing their job perfectly.
What is the best way to clean a clogged olla pot?
A simple vinegar soak is the most effective way to clear mineral buildup. Mix a solution of one part white vinegar to ten parts water and let the pot soak for several hours. Afterward, use a stiff brush to scrub the outside walls, which helps open up the pores that may have been blocked by hard water deposits or fine soil particles. This maintenance keeps the seepage rate consistent and extends the life of the clay.
