
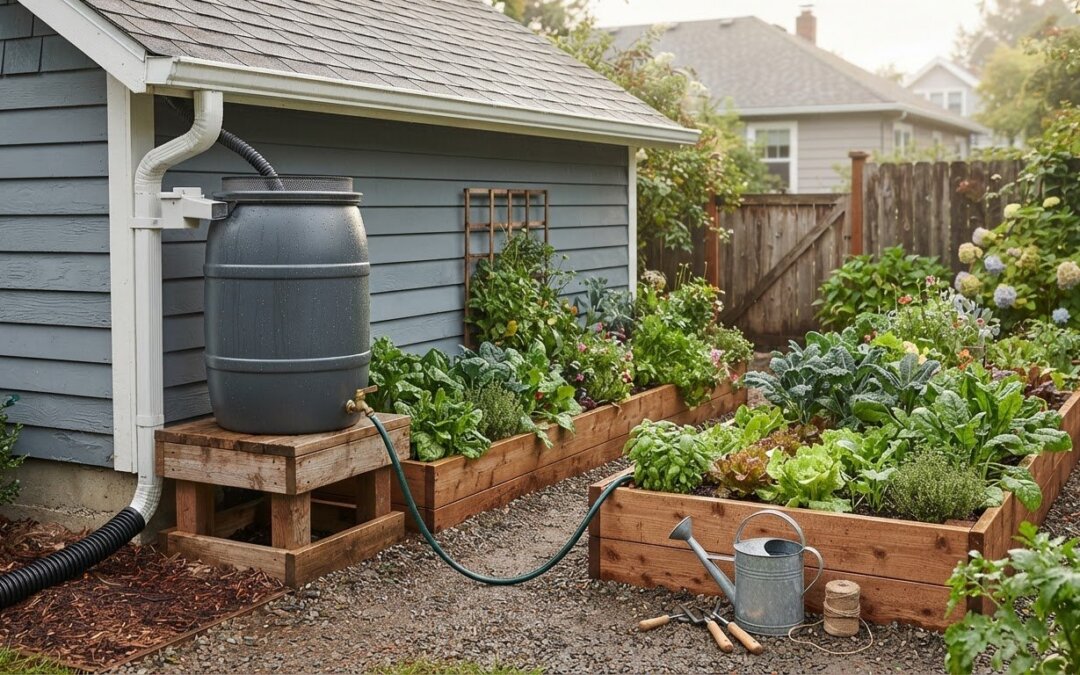
A reliable rain barrel setup for garden watering starts with a practical question: can water get from the barrel to your plants by gravity, or will the route need another solution? Where you place the barrel, how far the water must travel, and whether the garden sits above or below the outlet all affect how easy the system is to use. Planning those details first can prevent a setup that is awkward to reach or delivers a weak flow.
This guide covers choosing a location, connecting a downspout diverter, planning an overflow route, and testing a simple watering system. You’ll also learn how barrel height affects gravity flow, when a pump may help, and how to maintain the system as conditions change. Use the steps to build a setup around your garden, then adjust it after you see how the water moves.
Key Takeaways
- Trace the route from roof runoff to the garden outlet to identify which parts your setup needs.
- Choose hand watering, gravity-fed drip, or pump-assisted irrigation based on your garden layout and pressure needs.
- Set up the system in a clear sequence, then test the outlet and overflow before relying on it.
- Check screens, outlets, hoses, and connections regularly to catch flow problems early.
- Choose equipment to suit your setup and garden rather than adding parts you may not need.
Rain Barrel Setup: What the System Needs to Do
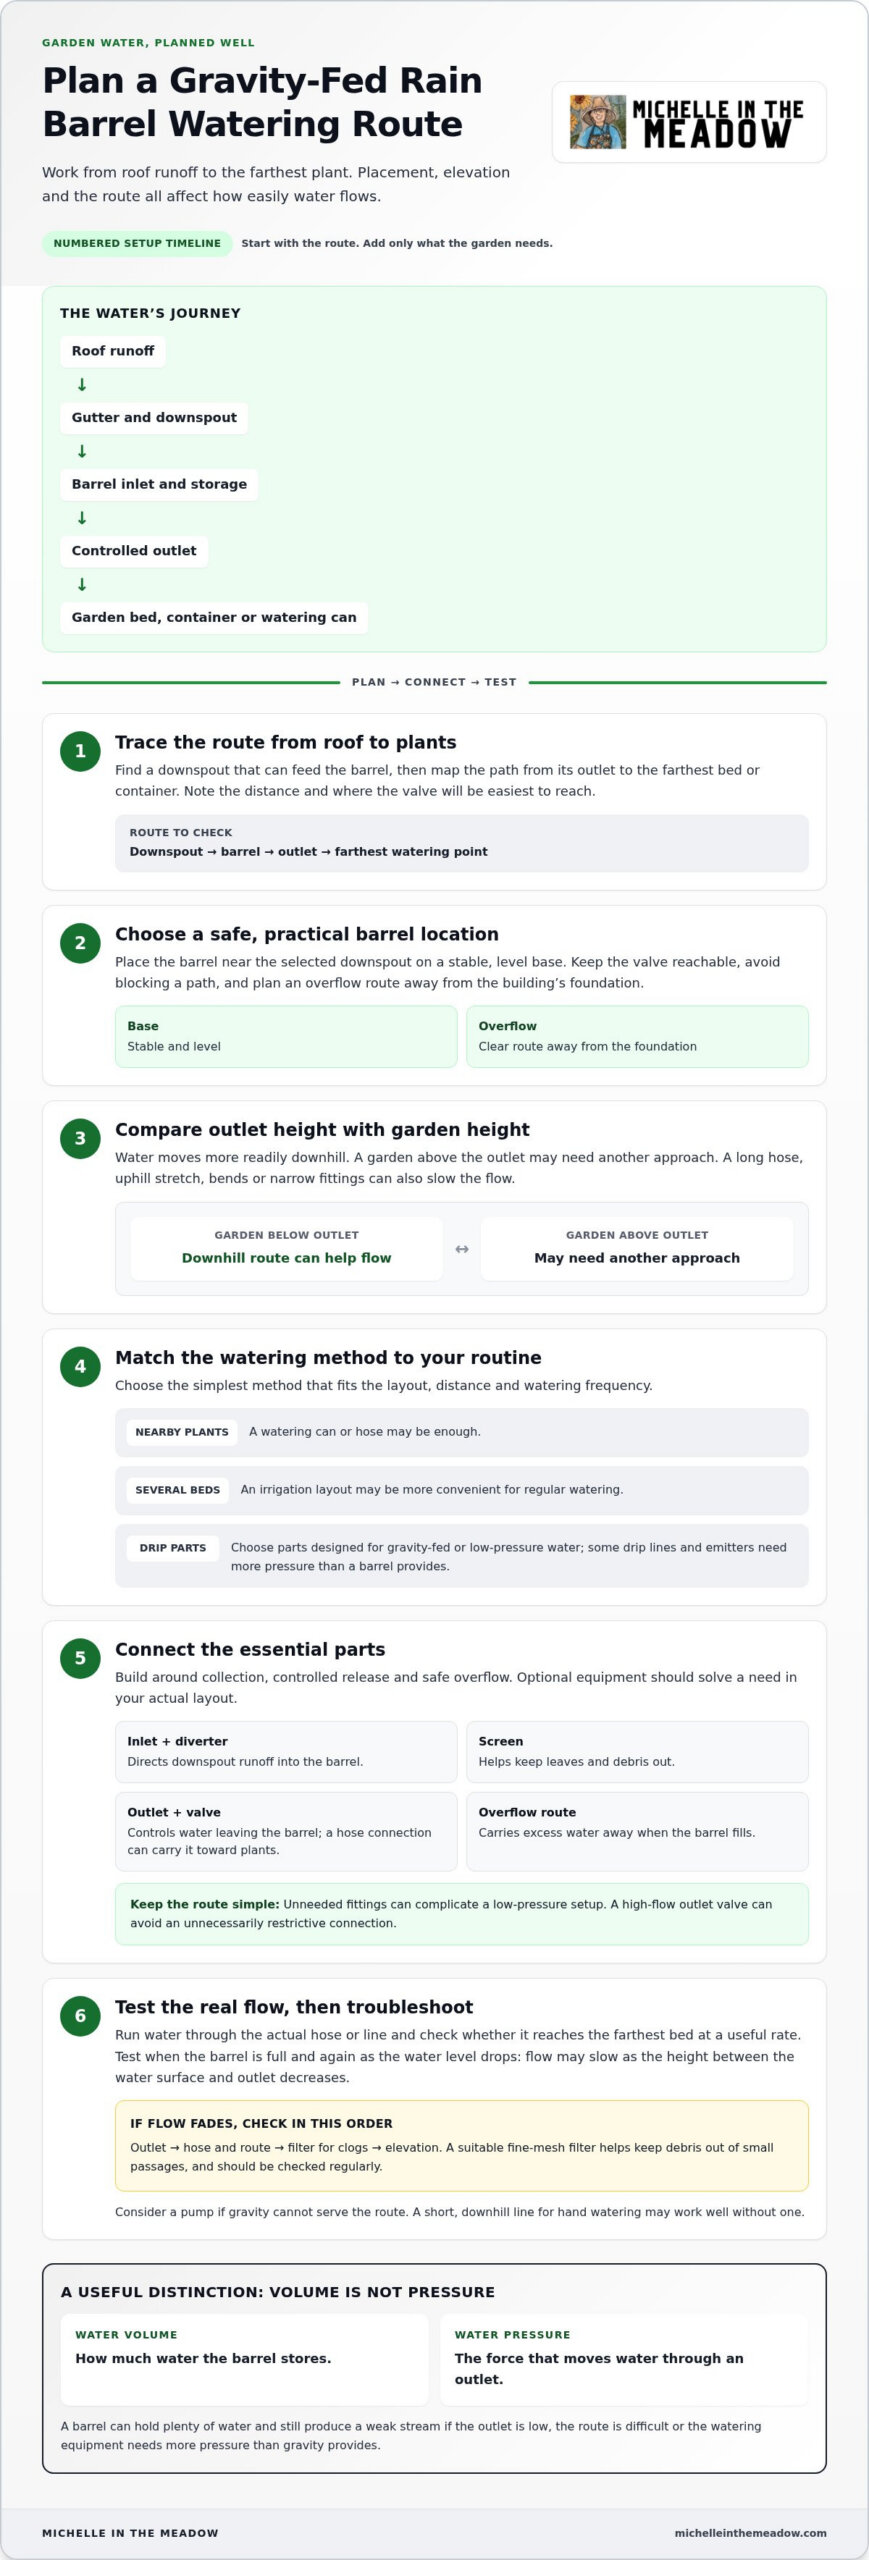
A rain barrel watering setup catches roof runoff, stores it, and gives you a way to move that water to plants. Rain flows across the roof into a gutter, travels down a downspout, enters the barrel, then leaves through an outlet toward a garden bed, container, or watering can.
The barrel stores water; it doesn’t determine how you’ll deliver it. You can open a valve to fill a watering can, attach a hose for nearby plants, or add irrigation parts to direct water through a garden. Choose based on the distance to your plants, the route’s elevation, and how often you plan to water. These are the key decisions in a rain barrel setup for garden watering.
This is one hands-on example of rainwater harvesting principles: collect runoff, store it for later, and put it to a useful purpose.
Which parts make up a basic rain barrel setup?
Begin with the parts that collect, contain, and release water. Some barrels include several features; others need compatible components. Before connecting anything, make sure the barrel is on a stable, level base.
- Barrel and inlet: The barrel stores collected water. An inlet, often connected to the downspout with a diverter, directs runoff inside.
- Screened opening: A screen over the inlet or opening helps keep leaves and other debris out while letting water enter.
- Outlet and valve: Water leaves the barrel through the outlet. A valve controls the flow, and a hose connection can carry water toward plants or a watering point.
- Overflow route: When the barrel fills, excess water needs a clear route away from the barrel and the building’s foundation.
The barrel, inlet, controlled outlet, and overflow path make up the basic system. Drip tubing, hose extensions, timers, and pumps are optional additions. Choose them only if your garden layout or watering routine calls for them.
What should you decide before setting up a barrel?
Walk between the house and garden before choosing equipment. Identify a downspout that can feed the barrel, then look for a suitable location nearby. Consider whether the valve will be easy to reach, where overflow will go, and whether the filled barrel can sit securely without blocking a path.
- Map the route: Estimate the distance from the outlet to the farthest bed or container. A short route may work with a watering can or hose; a longer one may need a different watering method.
- Notice elevation: Compare the barrel’s position with the plants. Water moves more readily downhill, so a garden above the outlet may need another approach.
- Match the routine: Occasional watering may call for a simple outlet and can. For regular watering across several beds, an irrigation layout may be more convenient.
These decisions help you choose a setup that fits the garden instead of buying parts before you know what the water needs to do.
How Gravity-Fed Rain Barrel Watering Works
Gravity feeding moves water from an elevated barrel toward an outlet below it. The height difference helps water flow, so a simple downhill route may supply a hose or watering point without a pump. The available force is limited, however, and the route matters as much as the barrel’s position. Penn State Extension’s rain barrel guidance also covers practical considerations for using stored rainwater in the garden.
Water volume is how much water the barrel stores; water pressure is the force that moves it through an outlet. A barrel can contain plenty of water and still produce a weak stream if the outlet is low, the route is difficult, or the watering equipment needs more pressure than gravity provides.
Test the flow where the water needs to reach your plants. A hose that works when the barrel is full may slow as the water level drops, because there is less height between the water surface and outlet. Account for that change if you’re planning regular irrigation instead of occasional hand watering.
How does barrel height affect water flow?
Positioning the barrel above the watering area creates a downhill path. More elevation can improve the available pressure, but there is no single height that suits every garden. The route matters too: a long hose, uphill stretch, bends, or narrow fittings can slow the flow. Test the actual hose or line and check whether water reaches the farthest bed at a useful rate.
Which irrigation parts work with low pressure?
Choose components designed for gravity-fed or low-pressure water. A high-flow outlet valve can avoid an unnecessarily restrictive connection, while a suitable fine-mesh filter helps keep debris out of small passages. Check the filter regularly, since a clog can interrupt flow. Some drip lines and emitters need more pressure than a barrel provides, so read their requirements before laying out the system.
Keep the route simple where possible. Avoid unnecessary fittings, and test the system at different water levels. If flow fades, check the outlet, hose, filter, and elevation before deciding you need a pump. A pump may help when gravity cannot serve the route, but a short, downhill line for hand watering may work well without one.
Pressure reducers and vacuum breakers are not automatic additions to every barrel setup. Use them when the instructions for your chosen irrigation components call for them. Otherwise, extra parts can complicate a low-pressure system without addressing its main flow limitation. For more practical guidance on matching garden equipment to your routine, explore gardening tips and tutorials as you plan your setup.
Choose a Rain Barrel Watering Method for Your Garden Layout
The right method depends on where your plants are, how often they need water, and how much time you want to spend watering. A few containers beside the barrel may be easy to reach by hand. Several beds on a regular schedule may suit drip lines or a pump. Start with the simplest route that meets your needs, then add equipment only if the garden calls for it.
Hand watering
Pressure needs: Low when filling a watering can. Hose flow depends on gravity and the outlet connection.
Layout fit: Nearby beds and containers, especially a small garden with changing watering needs.
Setup complexity: Simple. You’ll need an accessible outlet and a watering can or compatible hose.
Gravity-fed drip
Pressure needs: Low, but the line and emitters must suit the available pressure.
Layout fit: Beds that can be reached by tubing and benefit from repeated, directed watering.
Setup complexity: Moderate. Plan the line route and follow the equipment instructions.
Pump-assisted irrigation
Pressure needs: A pump can provide more pressure when gravity alone does not meet the system’s needs.
Layout fit: Routes or irrigation equipment that need more pressure than the barrel can provide by gravity.
Setup complexity: Higher, since the pump must suit the watering system and be installed as directed.
When is hand watering the simplest option?
For a nearby bed or a few containers, an outlet tap and watering can may be all you need. A hose can extend your reach, but barrel outlets and hose connections vary. Check that the parts fit before planning around a particular hose. Hand watering lets you direct water where it’s needed and notice dry or stressed plants as you go. The trade-off is time: you need to be there to water.
When should you consider drip lines or a pump?
Drip lines can suit beds that need regular watering along an accessible route. They distribute water through tubing and emitters, but gravity-fed pressure may not be enough for every design. Read the selected system’s pressure requirements before connecting it. A pump may be useful if the distance, elevation, or equipment needs exceed what gravity can provide. Follow the pump and irrigation instructions, and test the full route before relying on it.
Keep the rain barrel setup for garden watering proportionate to the garden. If hand watering is easy and fits your routine, there’s no need to build a more complicated system. If your beds need a steadier routine, compare compatible irrigation components through curated gardening product recommendations and choose an approach that suits your layout.
Set Up Your Rain Barrel for Garden Watering in Clear Steps
A dependable setup starts with the location and base, not the faucet. Choose where the barrel will sit, prepare a secure base, and plan the overflow route before connecting the downspout. Assemble the inlet and outlet according to the barrel maker’s instructions, then test the water path before adding long hoses or irrigation lines. Working in this order makes it easier to fix fit or flow problems while the setup is still simple.
How do you prepare the barrel location and downspout?
Choose a spot near a suitable downspout and within practical reach of the garden. The surface should be level and firm, and the base must support the barrel when full. Check the model’s load guidance when selecting a platform. Plan the overflow route at the same time, directing excess water away from the foundation and places where it could pool or create a muddy path.
How do you connect and test the watering outlet?
Follow the maker’s instructions for the downspout inlet, screen, outlet, valve, and overflow connection. Fittings are not universal, so match the hose or irrigation parts to the barrel’s outlet rather than forcing a connection. Once assembled, add water and check each joint for leaks. Test the outlet at the garden end before securing a longer route or laying tubing through beds.
Use this sequence as your setup checklist: choose the location, prepare a level base, plan overflow, connect the inlet and screen, attach the outlet, then test for leaks and usable flow.
- Choose the site. Stand near the downspout and picture the route to the beds or containers. Leave enough room to reach the valve and inspect connections. Avoid placing the barrel where overflow will collect against the house.
- Prepare the base. Set the barrel on a stable, level surface or support intended for its filled weight. Follow the barrel maker’s load guidance. An uneven or unsuitable base can make a full barrel unstable.
- Plan the overflow. Position the overflow connection so excess water drains away from the foundation and other problem areas. Keep the route clear, and consider where the water will go during heavy rain.
- Connect the inlet. Install the downspout diverter or inlet as directed for your barrel. Fit the screen securely to help keep leaves and debris out, and leave it accessible for cleaning.
- Attach the watering outlet. Fit the valve, hose, or chosen irrigation connection according to its instructions. Keep the route simple for the first test. Add extensions only after confirming the connection fits.
- Test the system. Let water enter the barrel, inspect the inlet and outlet joints, and open the valve over a suitable watering point. Check for leaks, confirm the overflow drains as planned, and make sure the flow reaches where you need it.
Build the rain barrel setup for garden watering around your garden, then adjust the route if the first test reveals a leak or weak flow. To help choose practical equipment for your setup, explore our gardening product recommendations.
Keep Your Rain Barrel Watering System Working Through the Season
Regular quick checks can catch flow problems before they interrupt watering. Inspect the screen, outlet, hose, and visible connections as part of your garden routine, especially after heavy rain or when you notice a weaker stream. Start with the parts you can see, then test the outlet to narrow down the cause.
What should you check when water flow slows?
Start with the basics: check how much water is in the barrel and whether the valve is fully open. Look for debris on the inlet screen or filter. Inspect the hose or tubing for kinks, visible blockages, or a shifted fitting. A long route or uphill section can also limit gravity-fed flow, even when the barrel outlet is clear.
Test the outlet before checking the full irrigation route. If water flows there but not at the garden end, the restriction may be farther along the hose or line. If the outlet flow is weak too, check the water level, valve, screen, and filter. Comparing the two points helps you narrow down where to look instead of assuming a particular part is at fault.
- Water level: Is there enough stored water to reach the outlet with useful flow?
- Valve and outlet: Is the valve open, and can water pass through the connection?
- Screen and filter: Is visible debris blocking the inlet or a filter?
- Hose or tubing: Are there kinks, obstructions, or uphill stretches along the route?
- Connections: Are there visible leaks or loose fittings that need attention?
How can you care for the system between watering seasons?
Clear debris from the screen and inspect the outlet, hoses, and visible connections as part of routine garden maintenance. Filters can collect material over time, so clean them according to the equipment instructions. If the flow changes after cleaning, repeat the outlet test and follow the route step by step. These checks can help you spot a new blockage or leak.
Before cold weather, follow the barrel maker’s guidance for draining or storing the barrel, and consult the instructions for any irrigation parts you’ve added. Preparation varies by model and equipment, so use the directions for your setup rather than relying on a one-size-fits-all winter routine. Keep removable components together so they’re easier to find when you use the system again.
A steady maintenance habit helps your rain barrel setup for garden watering stay useful through changing conditions: inspect visible parts, clear debris, test the outlet when flow drops, and follow the maker’s instructions for seasonal care. As you refine your garden routine, explore gardening product recommendations for equipment that may suit your needs.
Make Your First Waterings a Useful Test
Use the first few watering sessions to learn how the setup behaves in your garden. Notice which areas are easy to reach, whether the flow suits your routine, and what you might change before the next dry stretch. A rain barrel setup for garden watering doesn’t have to be perfect on day one. Small adjustments can make it a better fit for the way your garden grows.
As the season changes, pay attention to how your watering habits change too. Newly planted beds, containers, and established plants may need different approaches. Use what you observe to decide whether to keep the setup simple or try a different watering tool, rather than adding equipment just because it’s available.
For guidance on your next garden project, explore practical garden watering recommendations. Gardening tutorials and videos offer step-by-step learning, while curated recommendations can help you find useful supplies. Make one adjustment at a time and let your garden show you what works.
Frequently Asked Questions
Can you water a garden directly from a rain barrel?
Yes. You can use stored rainwater through an outlet, hose, watering can, or compatible irrigation system. For a small container garden, filling a can at the barrel may be easier than extending a hose. For a longer route, test the water path before the beds depend on it, then adjust your method if the flow or reach doesn’t suit your routine.
How high should a rain barrel be for garden watering?
There isn’t one ideal height for every garden. Choose a secure, level support, then consider how the outlet lines up with the plants and any uphill sections along the route. Raising a barrel can affect how readily water moves, but the whole setup matters. Test the actual outlet and watering equipment instead of relying on a general height rule.
Can a rain barrel run a drip irrigation system?
Yes, if the drip system works with the flow and pressure your barrel provides. Start with a small test section, such as one bed, and check whether water reaches the end of each line. Look for uneven output at the emitters, and clean the filter as directed by its maker. If the components need more pressure than gravity supplies, choose a compatible system or consider a pump rather than assuming the line will work as-is.
Do I need a pump to water my garden from a rain barrel?
No. A pump isn’t always necessary. A simple setup may work for nearby plants if gravity can move water to them. A pump may help if the route climbs, extends far from the barrel, or uses equipment with higher pressure needs. Compare the flow at the outlet with the flow at the farthest plant, then follow the equipment instructions to decide whether a pump is appropriate.
How do I calculate the rain barrel size I need?
Estimate your needs by tracking how much water you use in a typical watering session and how often you expect to water between rainfall events. Then consider how much runoff your roof can direct to storage and how much space you have for a barrel. Local rainfall records can help with planning, but weather and garden demand vary. Treat the estimate as a starting point and compare it with the barrel’s stated capacity.
Is rain barrel water safe to use on vegetable gardens?
Rain barrel water quality can vary, so don’t assume it’s suitable for every use on edible plants or safe to drink. Roof and gutter materials, accumulated debris, and storage conditions can affect the water. Keep the collection system clean, and look for public-health or agricultural guidance relevant to your intended use, especially if water may touch edible parts of crops. If you’re uncertain about its safety, use another water source for those plants.
What should I do if my rain barrel overflows?
Check whether the overflow outlet is clear and whether its route still directs water away from the home. Leaves or other debris can obstruct an opening, so inspect the screen and inlet too. Watch where the water goes during rainfall. If it pools near a path or foundation, adjust the overflow route to suit the site and follow the barrel maker’s instructions for connecting or repositioning it.